 United States
Stuff Bag
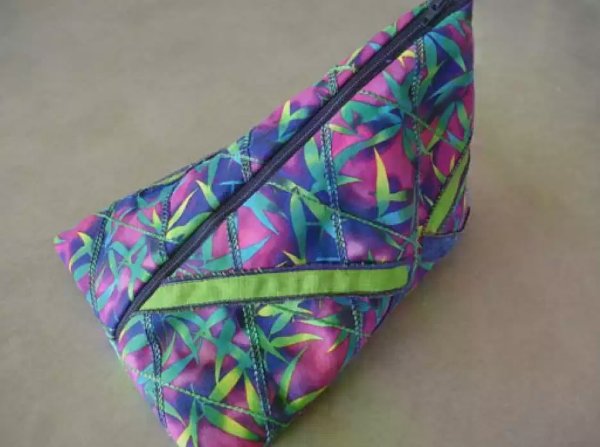
Create a small bag for all your "stuff". It is a quick and easy project with your Coverlock machine.
What you need:
- Cover stitch overlock machine
- Piping Foot 620086796
- ½ yard print fabric for bag
- ⅛ yard each of two contrasting fabrics for “serger ribbon”
- ½ yard fabric for lining
- 11” X 15” batting
- 12” zipper or longer (regular or invisible)
- Sulky Blendables 12 wt. thread for coverstitch
- 3 cones of serger thread
- ½ yard Interfacing (optional)
- Marking pen
- Rotary cutter, mat and ruler with 30° & 60° markings
- Spray starch
- Temporary spray adhesive (optional)
Cut:
- Print for bag: 1 piece 11” wide x 15” long
- Lining fabric: 1 piece 11” wide x 15” long
- Contrast fabrics: Lay wrong sides of contrasting fabrics together and cut into strips, at least 1” wide across width of fabric.
Note: Interfacing is used to stabilize bag fabric if necessary.
Flatbed work:
1. Spray starch bag fabric well, it should feel quite stiff, or fuse interfacing to the wrong side.
2. With the wrong side of the fabric up, line up the 30° mark on your ruler with one long edge of the bag fabric. Mark a 30° line and draw parallel lines every 2”.
3. Line up the 60° mark on the ruler with one short edge of outer fabric piece. It should form a diamond with the 30° line. On wrong side of fabric, mark a 60° line and draw parallel lines every 2”. (You might choose to draw these lines after stitching on the 30° lines)
4. Select Coverstitch Narrow and thread with serger cone thread in both needles and Blendables 12 wt. in chain looper. Loosen the looper tension and decrease the pressure on presser foot by one click. Practice on a scrap to adjust the stitch.
5. Using an anchor cloth to start the stitching, stitch, with wrong side up, on one set of lines.
6. Set for Chainstitch. Change the thread color in looper to a different color and stitch with chainstitch on other set of lines.
Rolled edge ribbon:
1. Set for 2-thread rolled edge. Thread with serger thread in both the needle and the looper.
2. Place the two fabrics chosen for the ribbon wrong sides together. Serge a rolled edge along one side.
3. Align the rolled edge along the left side of the presser foot and serge a rolled edge on the other edge of the fabric. You will be cutting off some fabric.
Topstitch ribbon:
1. Convert your coverlock™ 4.0 to chainstitch with serger thread in the needle and looper. Attach the Piping foot.
2. Align rolled edge of ribbon with the groove in the piping foot and topstitch in place randomly, using the chainstitch.
Zipper:
1. Zipper is applied using chainstitch with same set-up as for topstitching ribbon.
2. Unzip zipper. Position zipper tape along raw edge of one end of bag fabric with right side of zipper to right side of fabric. The edge of zipper tape meets the raw edge of fabric. Place right side of lining to right side of bag fabric. Zipper is sandwiched between the two fabrics.
3. Place batting on the wrong side of lining fabric. Temporary spray adhesive may be used sparingly to hold the two layers together. Align zipper teeth with groove in piping foot and stitch zipper to end of fabric. Stitch with the outer fabric on top to easily feel the zipper teeth and keep them in the groove.
4. Zip the zipper and mark where the edge of the fabric meets the zipper tape. Use this mark to align the zipper to the other end of the bag fabric. Sandwich, layer and stitch as before.
5. Press zipper.
Three thread seam:
1. Select 3-thread overlock, wide. Thread the needle and both loopers with serger thread.
2. With lining side out, fold one end so the pull end of the zipper is at a folded edge. Be sure zipper is unzipped back past the seam area and stitch the end closed. Stitch slowly over the zipper area.
3. Fold the other end so the zipper is centered between the two folds, serge this end.
4. Turn right side out through the zipper.