United States
Recycle Scraps into a Backpack
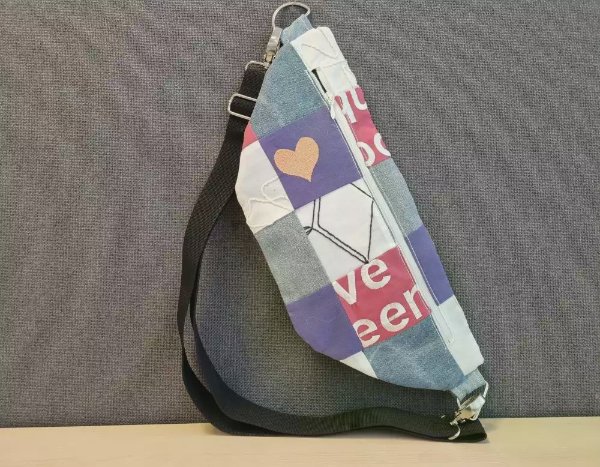
Don’t know what to do with that large pile of fabric scraps and old sewing tests just laying around? Practice on your piecing technique, how to line a project and sew a zipper with this easy scrap-pieced backpack.
What you need:
- Pieces of fabric
- A piece of fabric for lining (an old bed sheet or whatever you have leftover in your stash)
- 1 zipper, 12 inches (30 cm)
- Sewing and bobbin thread
- Bag strap (I reuse the strap from another bag of mine)
- 2 pcs of D rings for strap attachment
- Quilt ruler (optional)
- Rotary cutter (optional)
Preparations
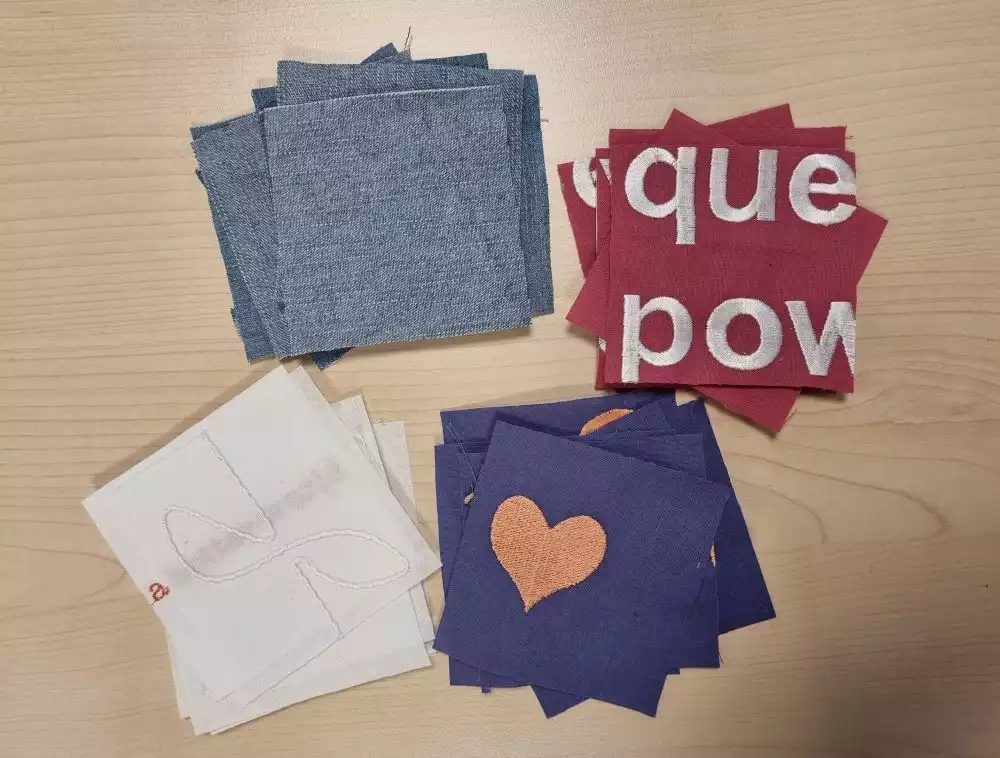
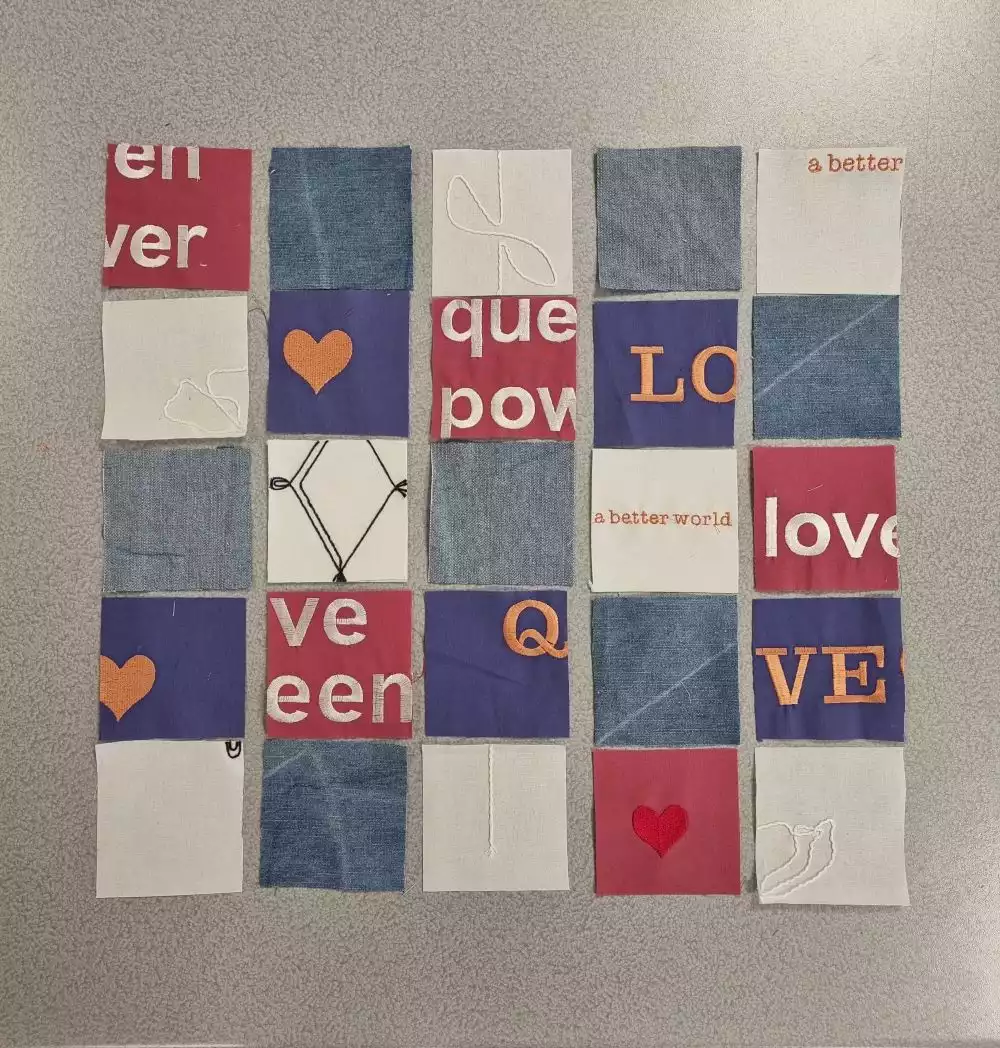
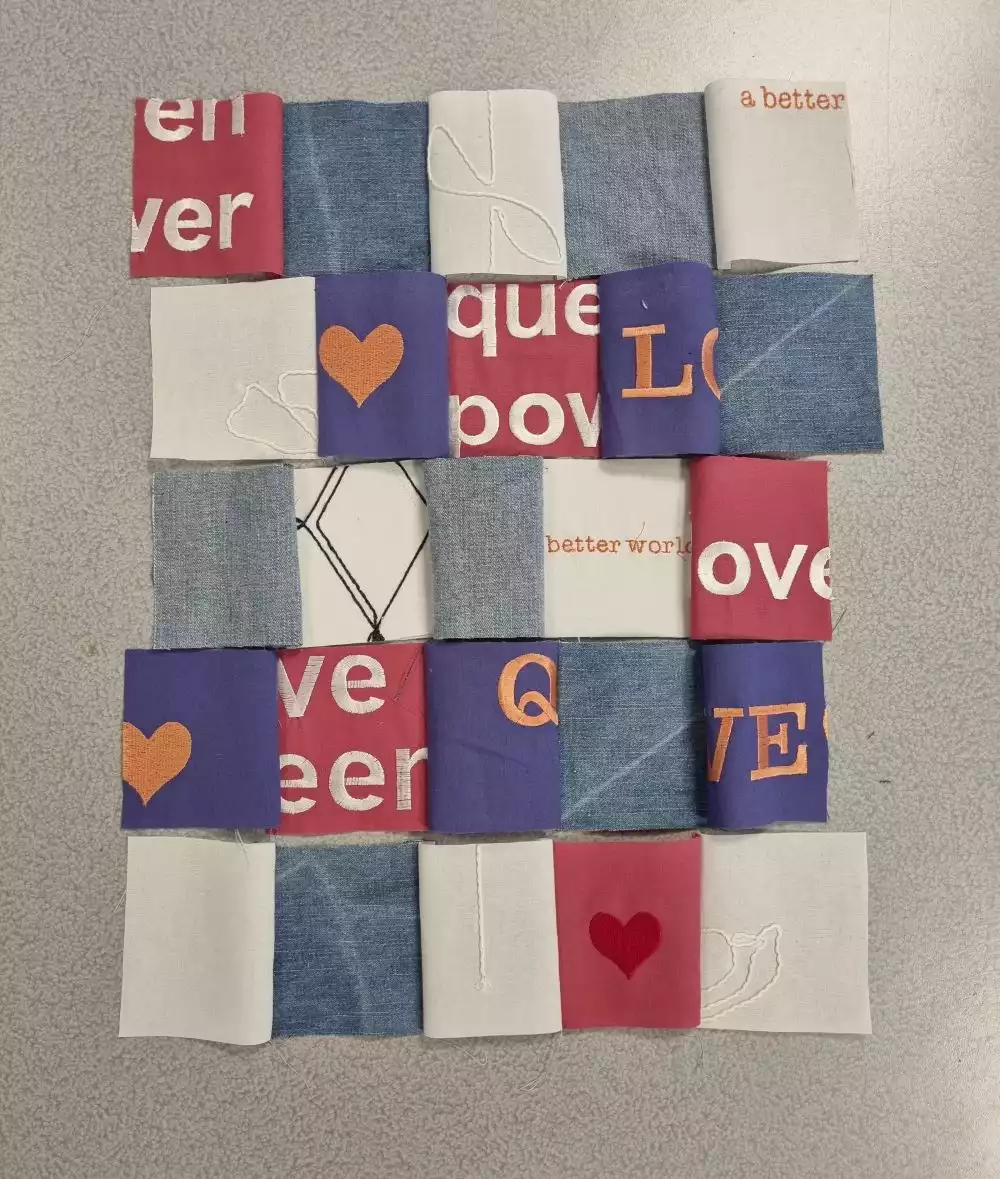
1. Cut your scraps into 3.5x3.5 inch (90x90mm) squares, you will need about 25 pieces in total. If you have a quilt ruler and rotary cutter those are great tools to get that precise 90 degree square.
Let's create the pattern for the back pack.
2. Decide the size of your bag, I’ve chosen the measurements in the pattern below:
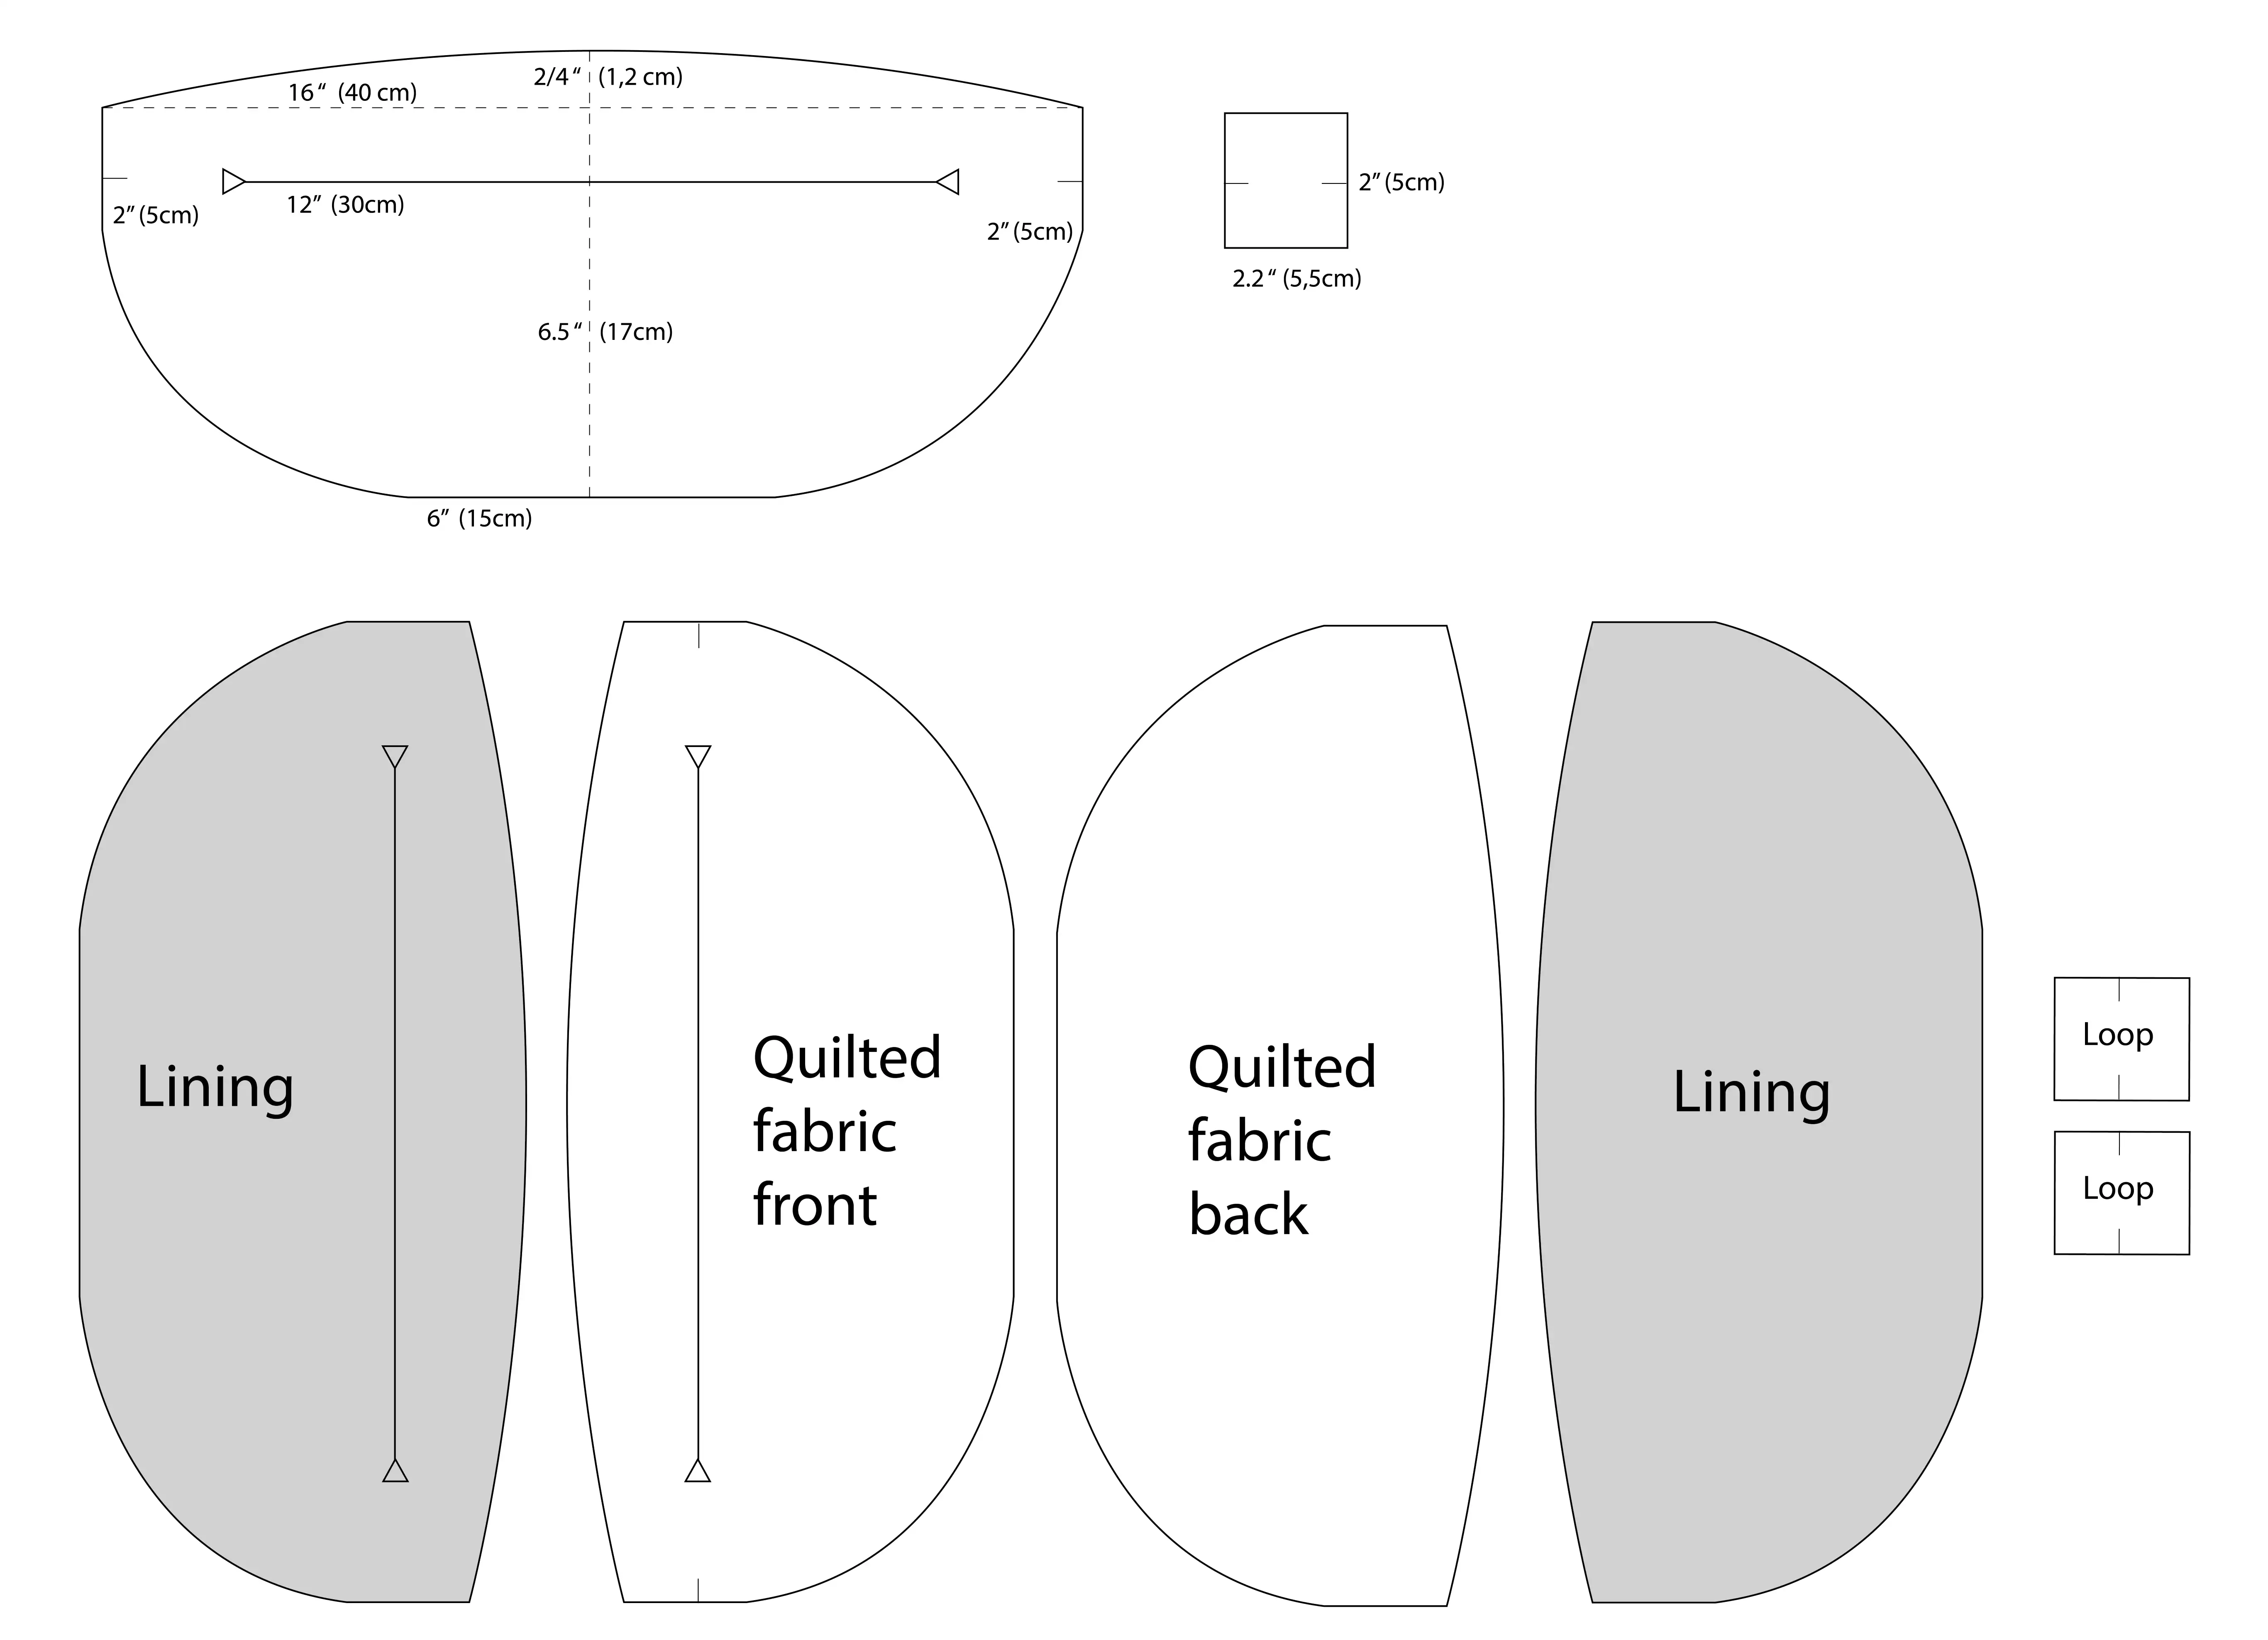
3. Cut out the lining and the two loop pieces.
Time for piecing
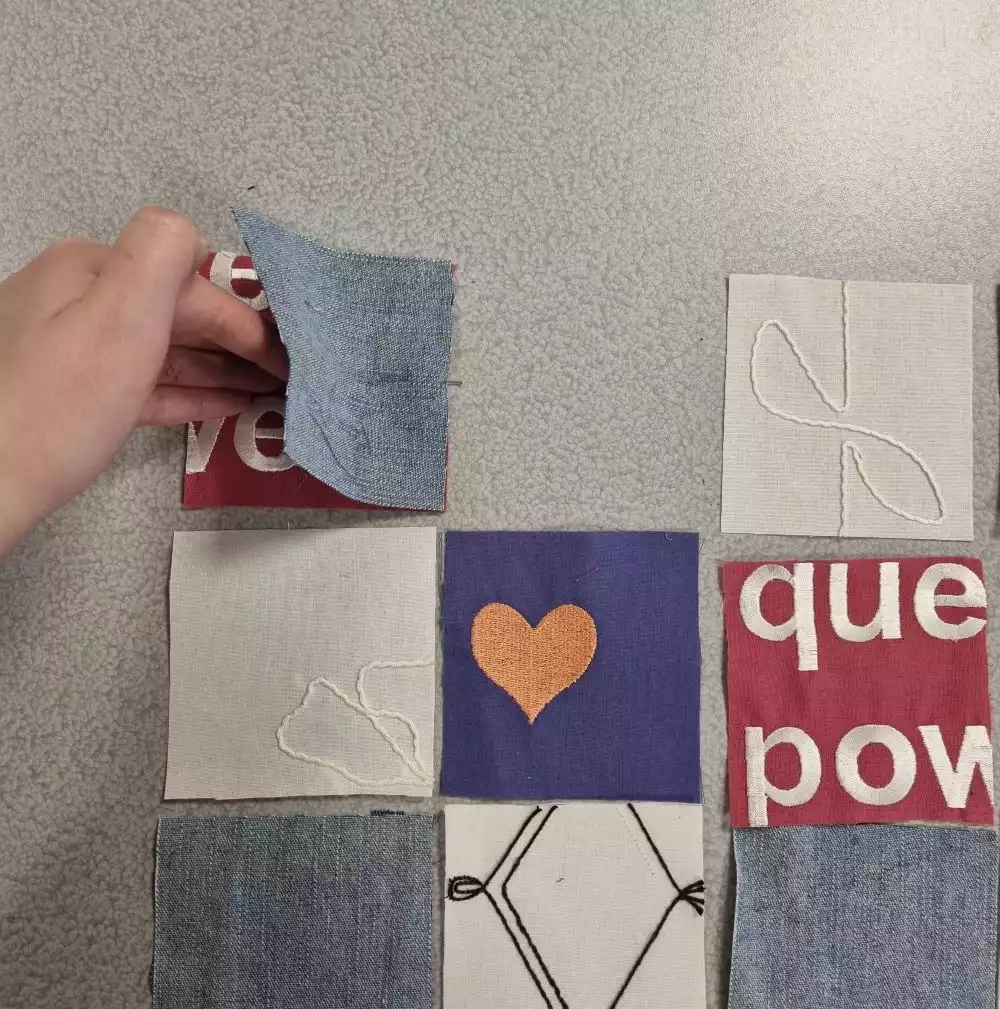
4. Place your quilt squares in a pattern of your choice. 5 squares in length and 5 squares in width. Creating 5 vertical rows with 5 squares in each. A tip before you start piecing is to take a photo so you always know your planned motif, sometimes it can get confusing when you start moving the pieces around when doing piecing.
5. Now let’s start piecing. Fold the top square of the second vertical row over the top square of the first row, making them face sides together. Place a needle to hold in place. Continue this process with the entire row.
6. Then pair up row 3 and 4, and do the same thing with them.
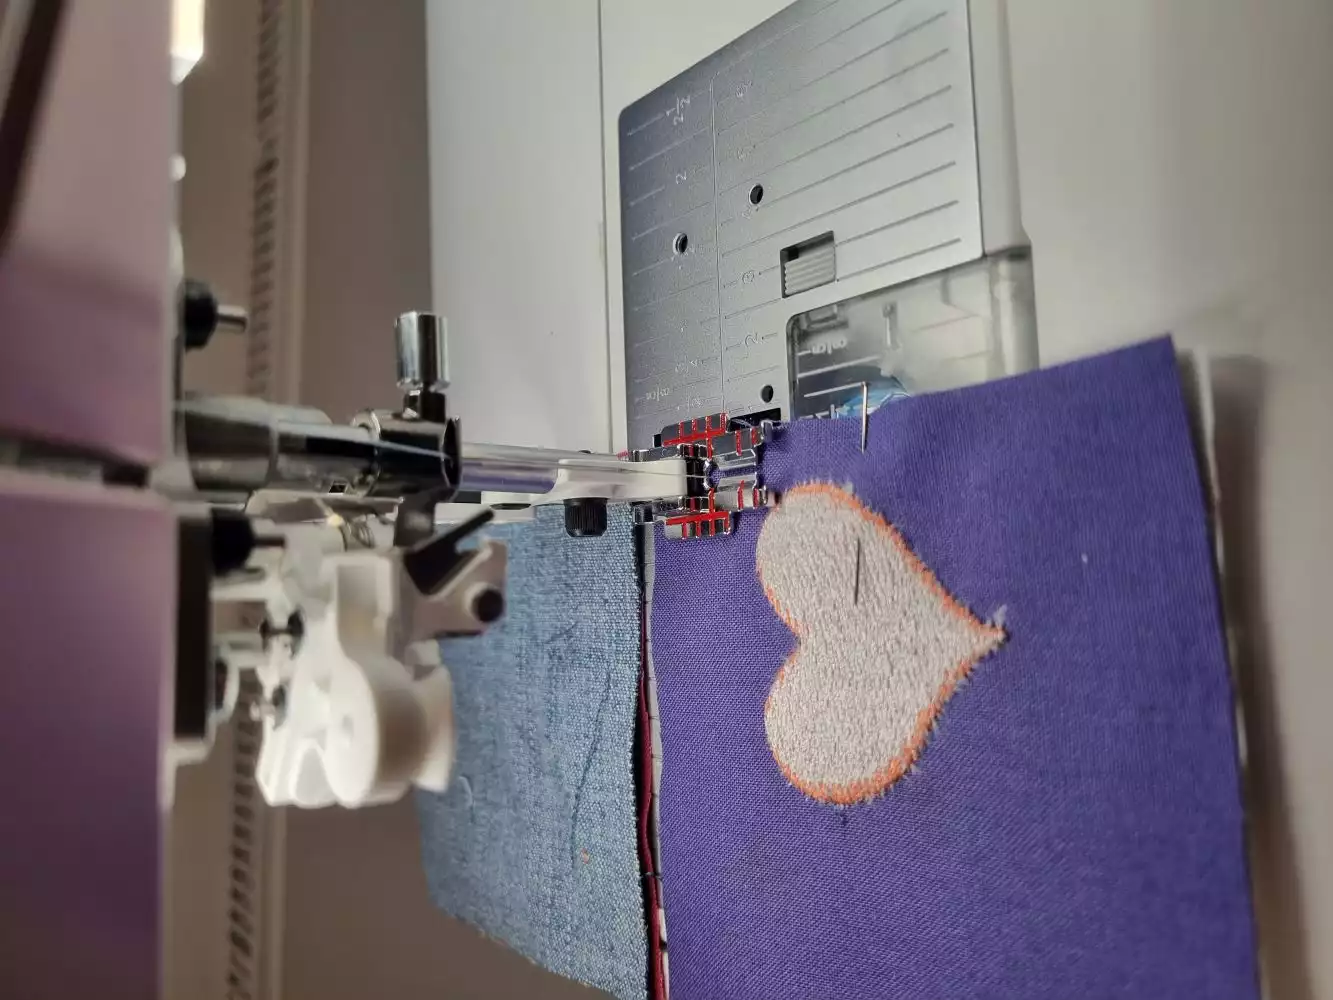
7. Thread the sewing machine with regular sewing thread in top and bobbin and attach a suitable presser foot. If you have a piecing presser foot that is great, but a regular standard presser foot will work too. The standard quilt seam allowance is ¼ of an inch (6mm) so that is what we will use.
8. My machine also comes with a Straight Stitch Needle Plate, which will perfect the quality of the straight stitch even more, so I will use that and a quilt piecing foot.
9. Load a straight stitch and start piecing one after the other. No need to fix and cut between the squares. Cutting them apart is done quicker afterwards.
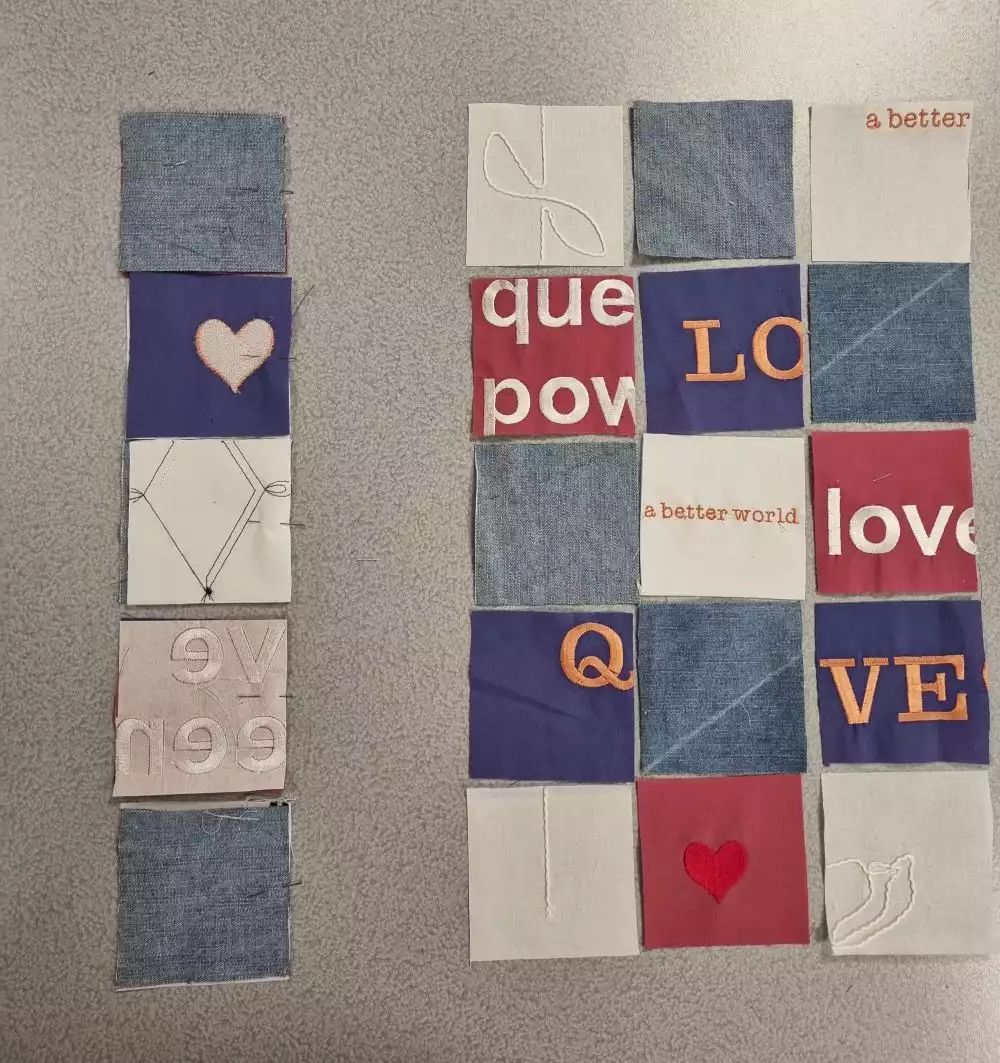
10. When you now have your 2 double rows sewn, and the thread has been cut between them, use the same principle as before and fold row 3 on top of row 2 and row 5 on top of row 4. Sew these together too.
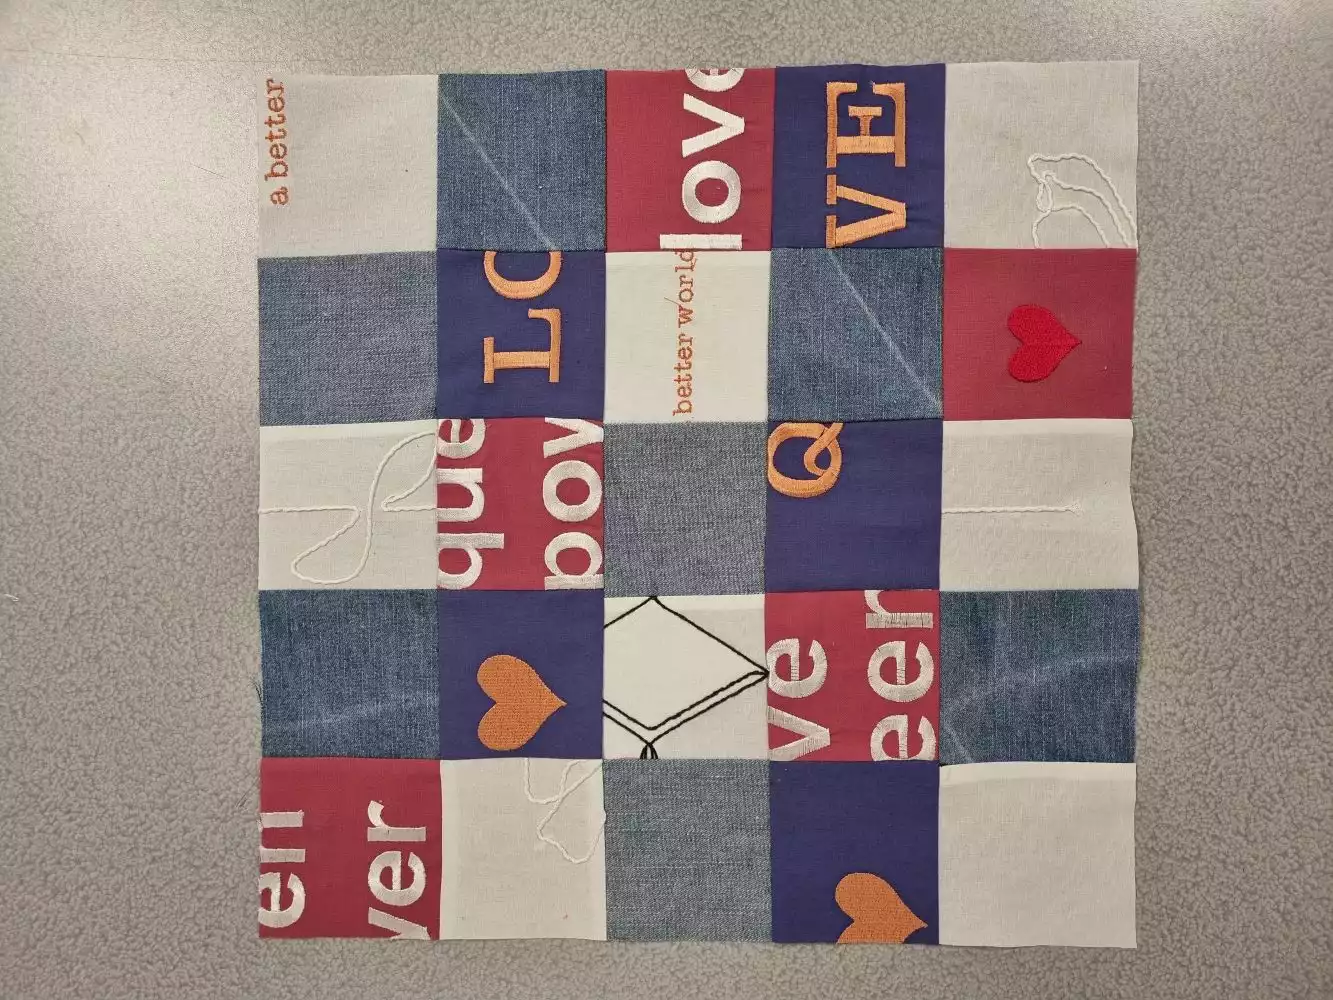
11. Now all five rows are sewn together creating horizontal rows instead.
12. Take your rows to the ironing board to press the seam allowance. Make sure to press your allowances in different directions to avoid bumps.
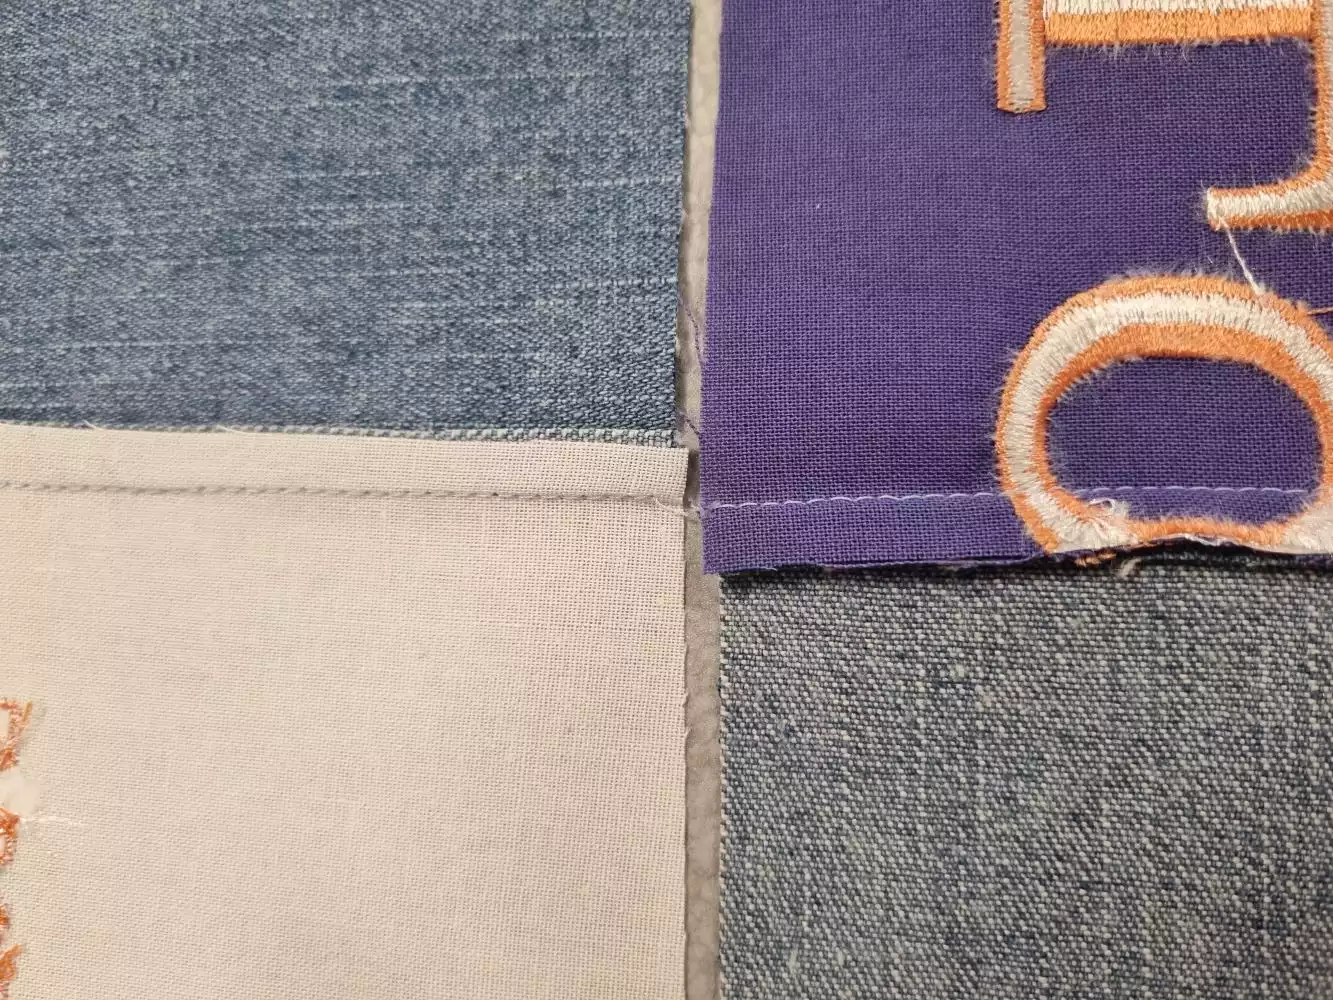
13. For instance: I will press all seam allowances on the top horizontal row towards the left. And the second horizontal row towards right, etc.
14. Now for the final piecing step. Fold the top horizontal row over the second one, making them face side together and place needles at the intersections. Do the same thing with row 3 and four.
15. Sew row 1 and 2 together and row 3 and 4 together. Then sew row 2 and 3 together and row 4 and five together.
16. Last step is to press down the seam allowance and give it a final press.
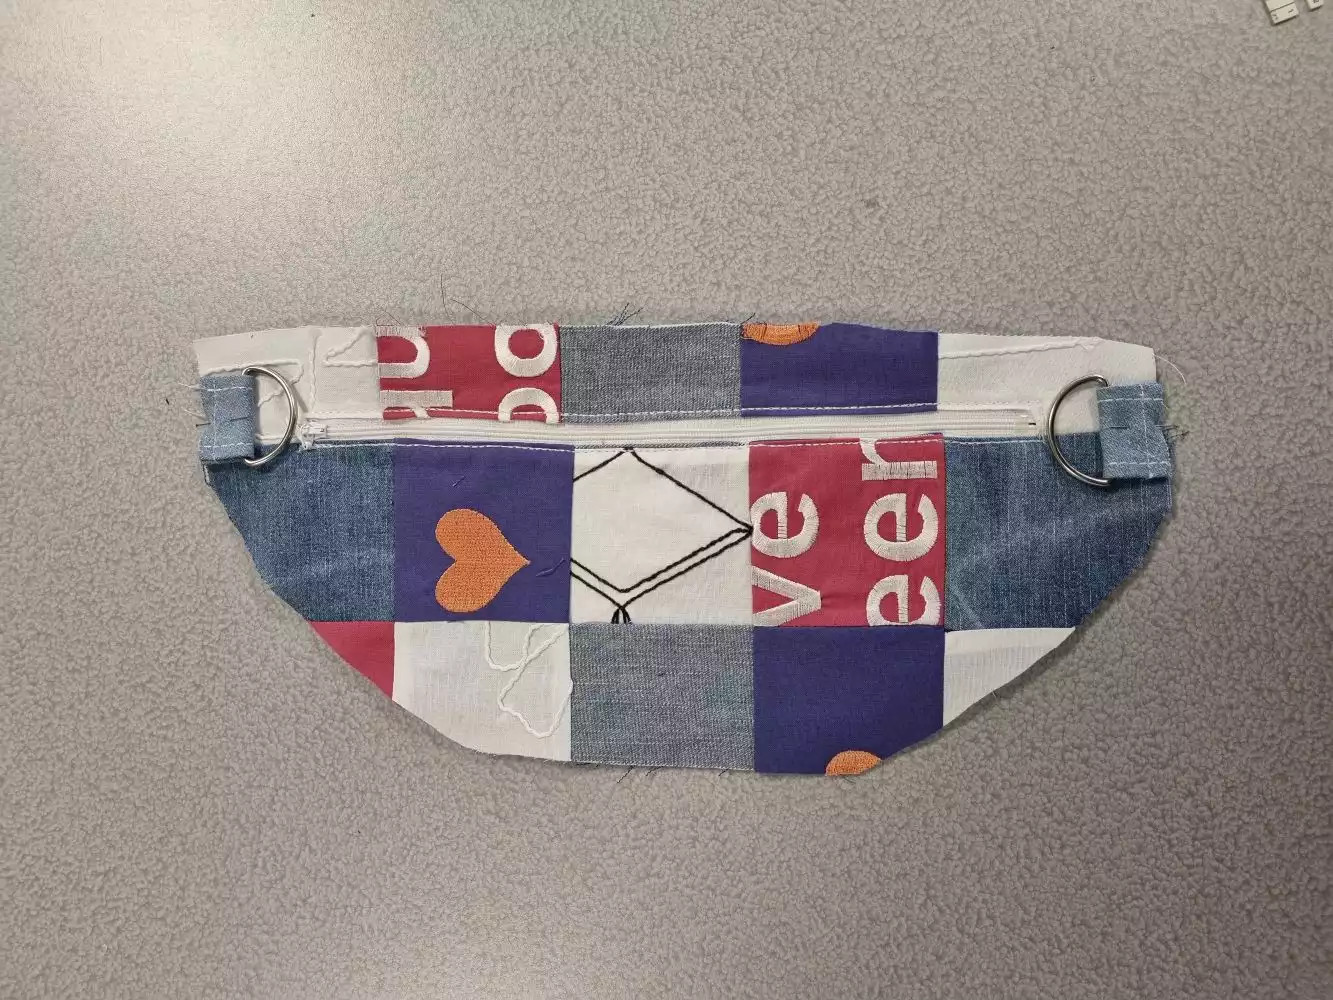
Sew the zipper
17. Using the paper pattern or the already cut lining piece as a template, cut out the front and back piece of the bag from your quilted fabric.
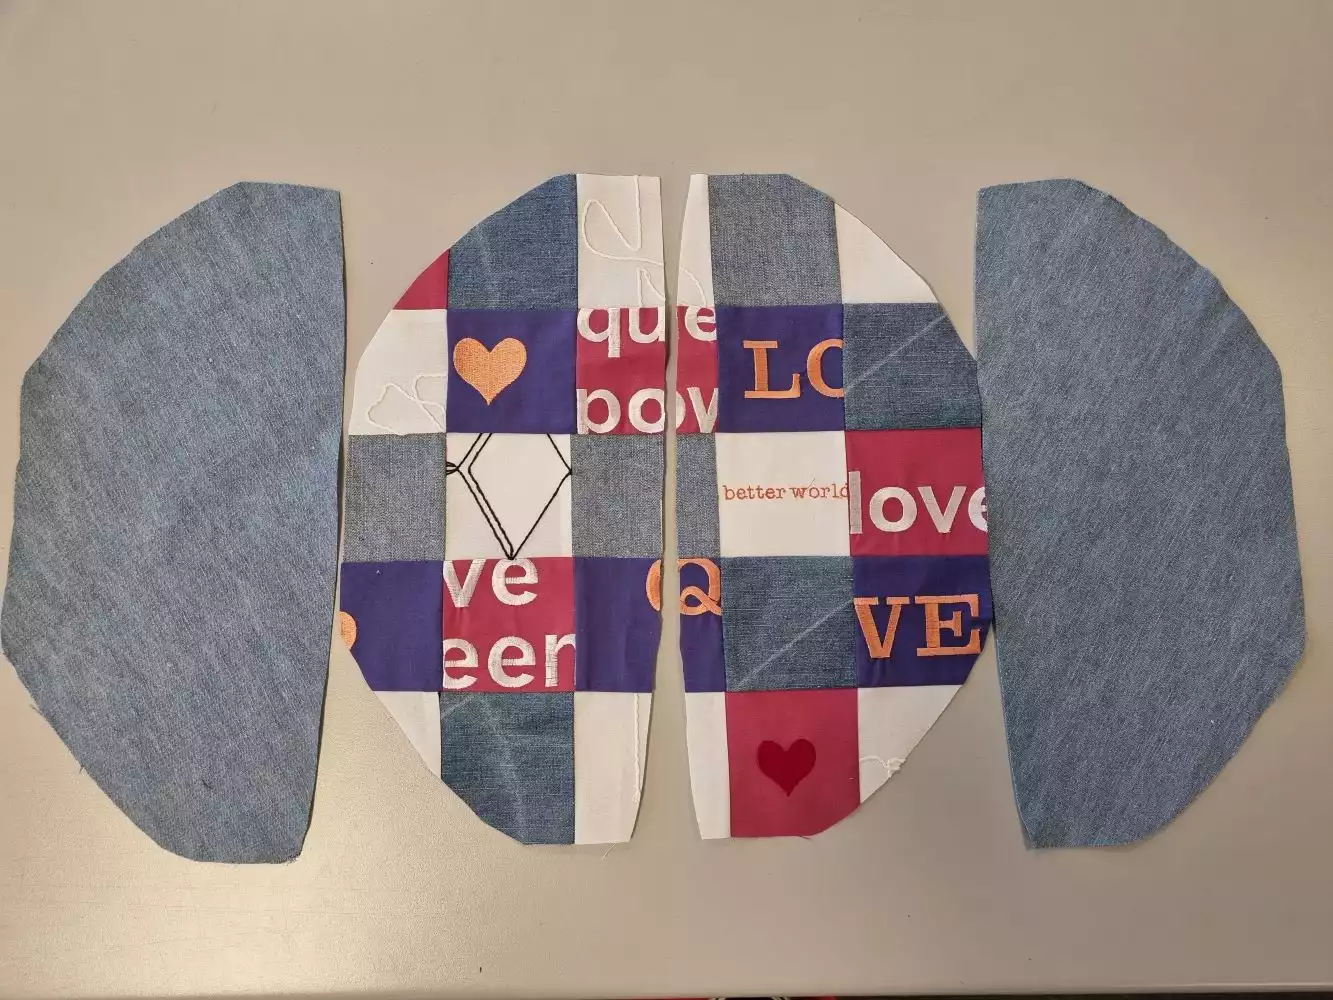
18. Mark the placement of the zipper on top of the quilted fabric and on the lining from the markings on your paper pattern. Cut along the center line and out towards the corners.
19. Go to the Iron and press ¼ “ (6 mm) on each side of the cut towards the rear side, as well as the end triangles, so the right side gets a rectangular opening.
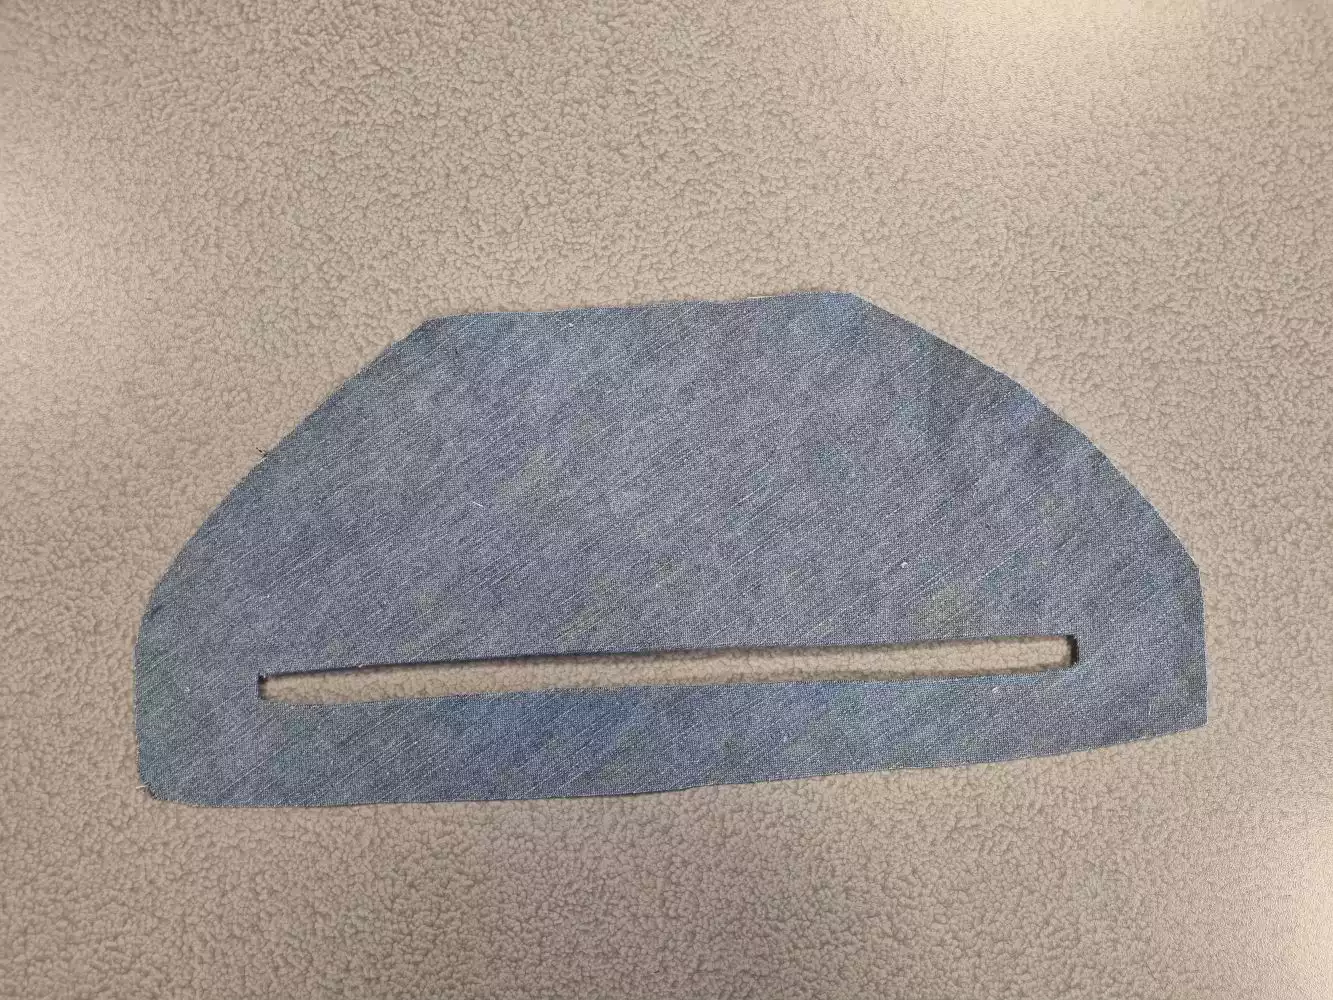
20. Place the zipper inside the opening on the quilted fabric and add a few pins to hold it in place.
21. Prepare your sewing machine with a regular sewing thread, both top thread and bobbin in a color of your choice.
22. Load a straight stitch and set the stitch length to 3.5. Since I used a Straight Stitch Needle Plate for my piecing, I will now remove it and attach the regular needle plate instead.
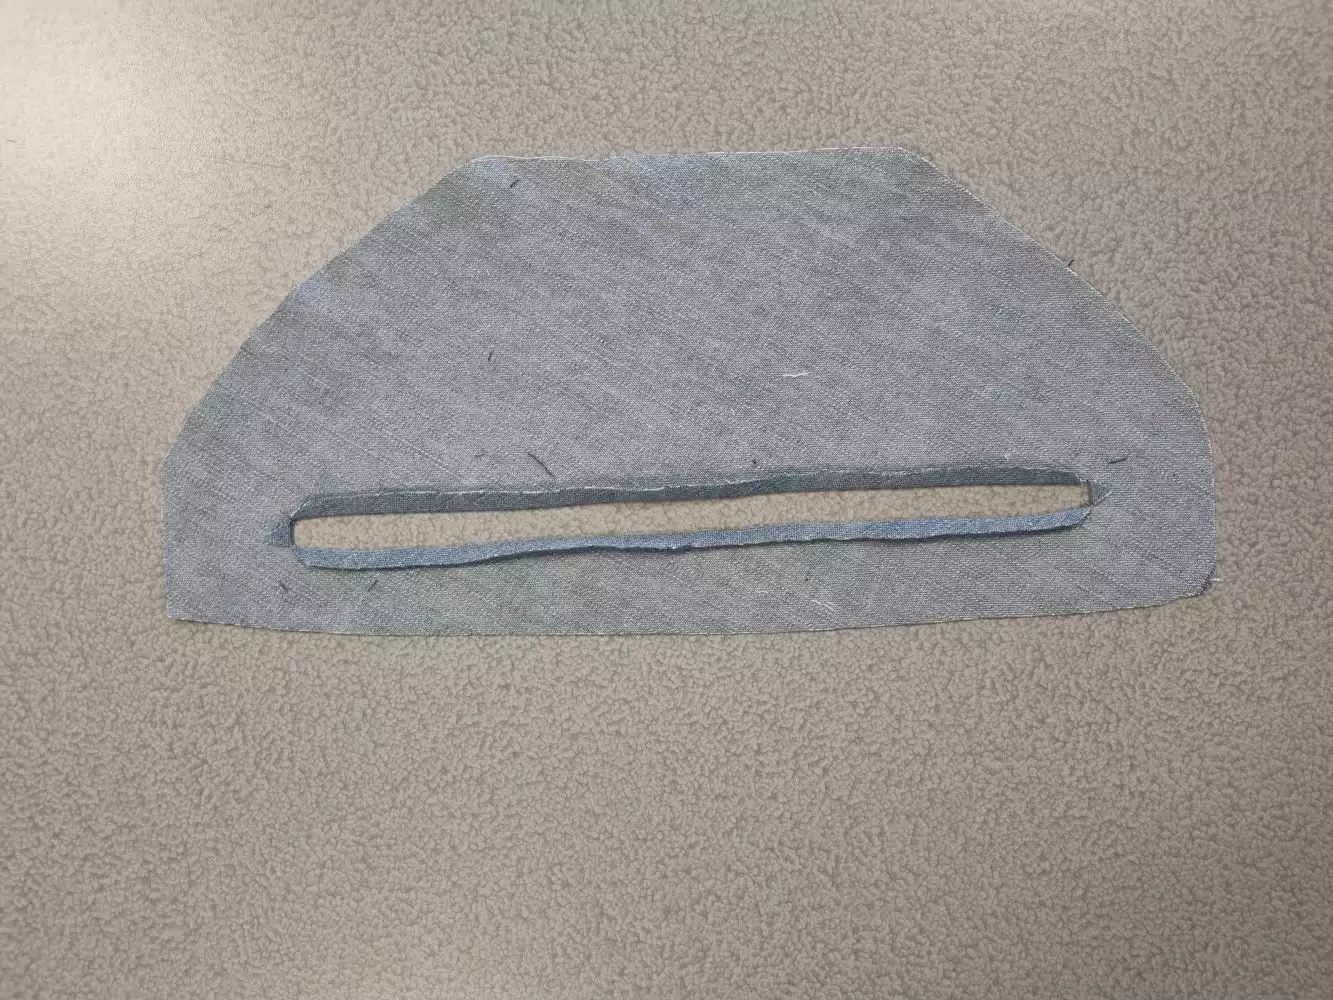
23. For sewing on a zipper, it is best to use a presser foot designed for zippers, so that’s what I will use. I also want to move the needle’s position so it is positioned 2mm from the edge as that is where I want to sew. In the beginning of the zipper it is best to open it an inch so the puller is not getting in the way. When you have sewn a couple of inches it is best to raise the presser foot and close the zipper again.
24. Fasten the zipper by sewing around the opening, 2mm from the opening edge. Don’t forget to fix the threads at the beginning and end of a seam.
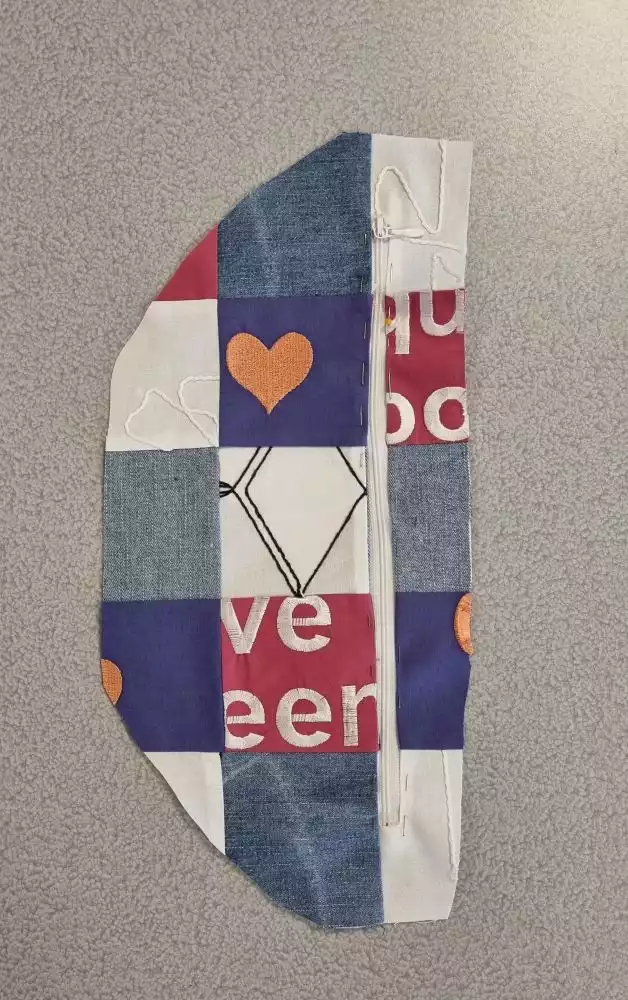
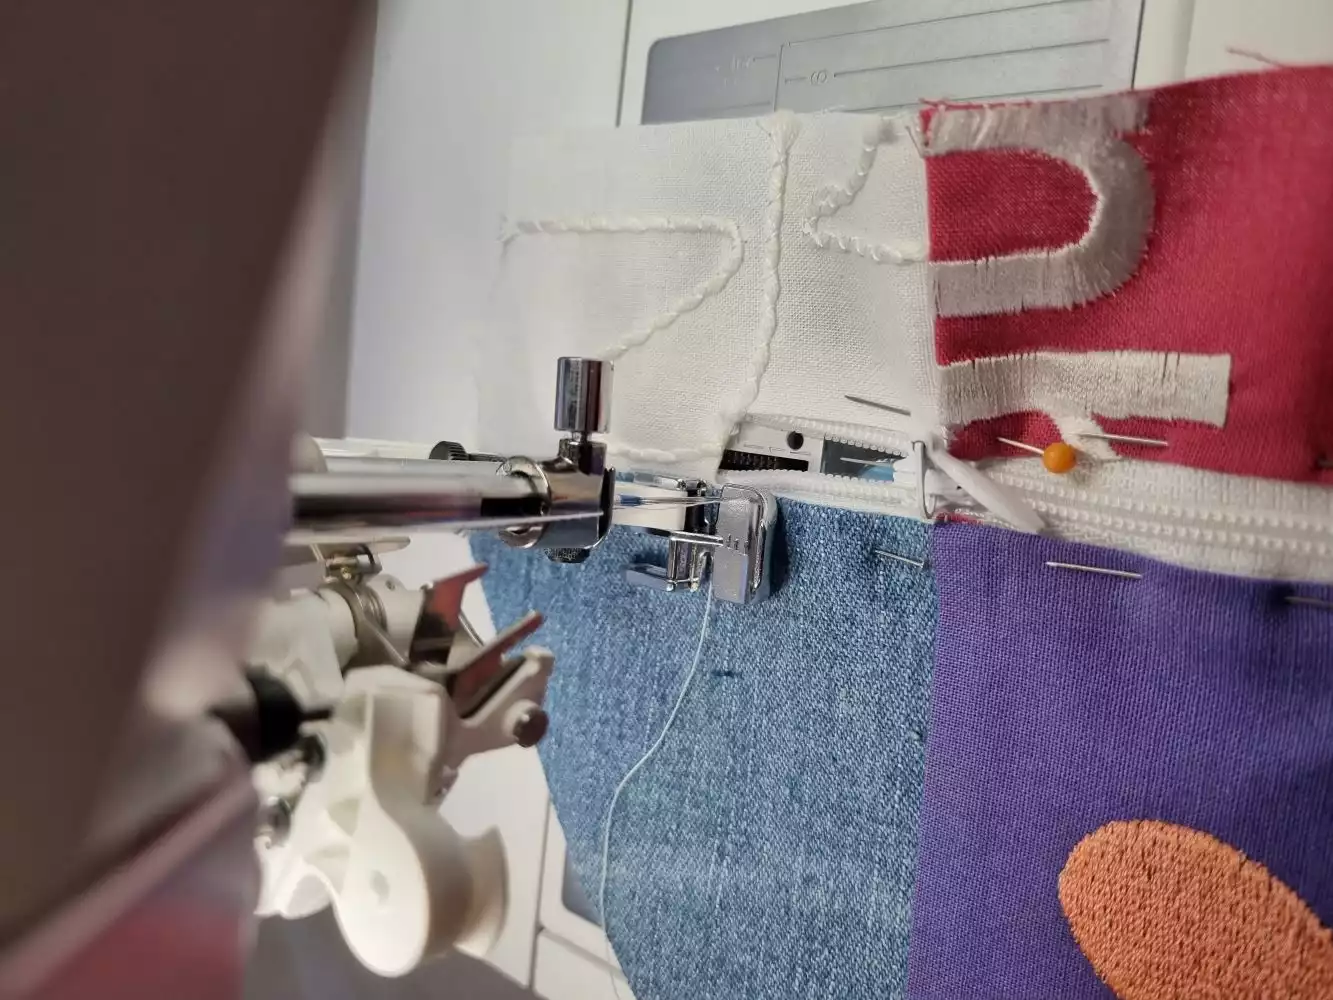
25. Now add the lining piece underneath the sewn zipper. Match the openings and place a few needles or hand baste it in place.
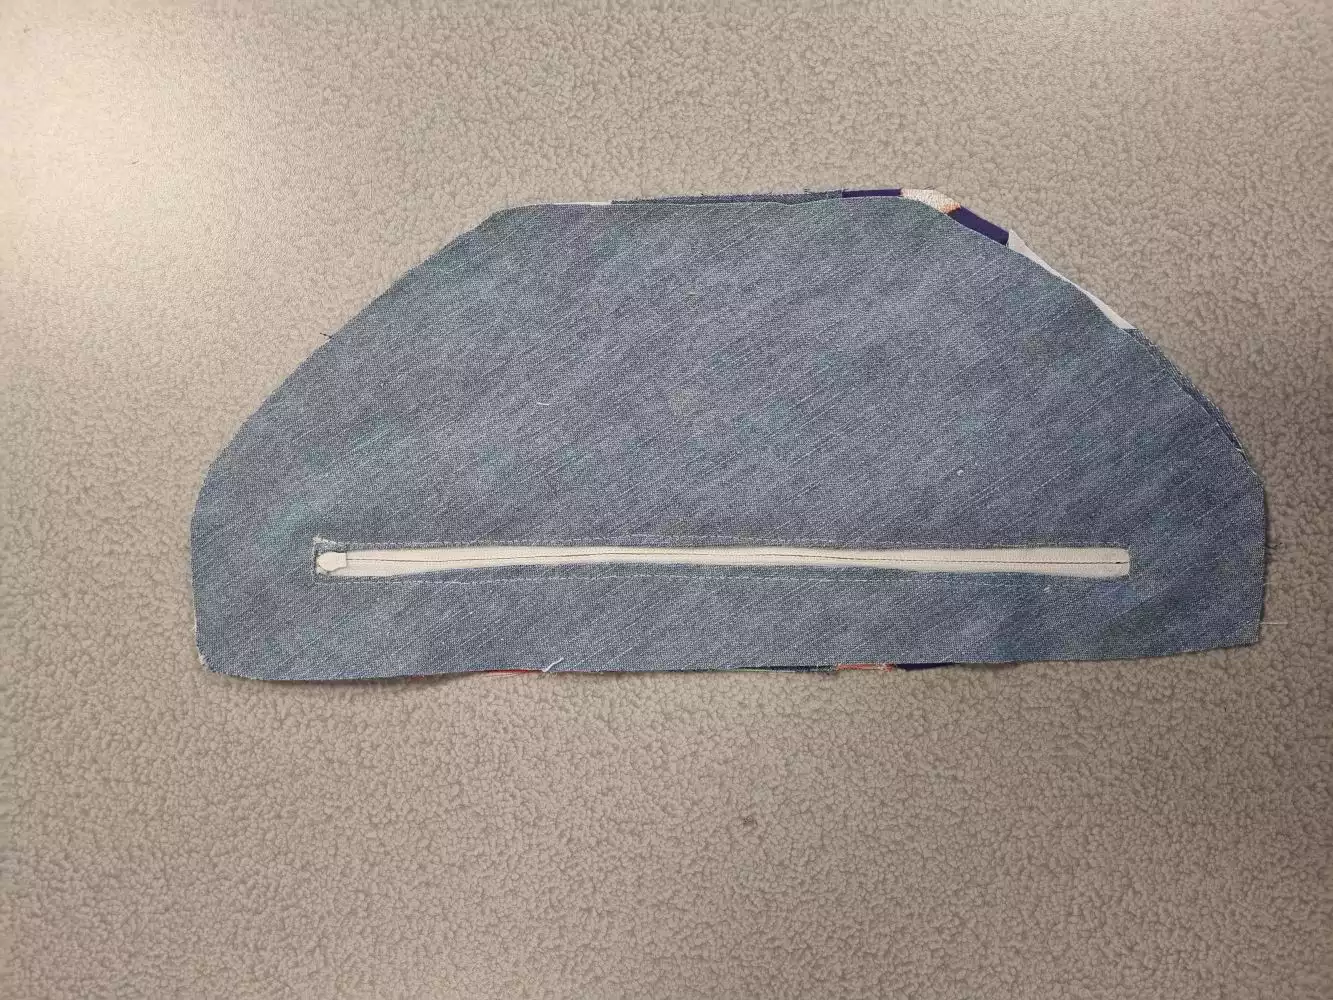
26. Fasten the lining by sewing a second seam on top of the one you did for attaching the zipper on the top side. Sew from the front side and try your best to follow the same stitch holes.
Tip: When sewing a zipper this way, it can be fun to decorate the opening with a more decorative stitch than the regular straight stitch.
27. Load a bartack stitch and sew it on the edges of the zipper for additional support. (optional)
Lining
28. Place the front and back lining pieces face-side together and add a few needles to hold them in place.
29. Load a straight stitch with stitch length 2.5. Sew together the lining with 1 inch (2,5cm) seam allowance. Leave a 2 inch (6 cm) opening on the top, in the middle, above the zipper. Don’t forget to fix in the beginning and end of the seam since this area in particular will sustain a lot of pressure.
Tip: for extra strength, you can also use an overlock stitch around the lining.
30. Cut away 2/4 “ (1,2 cm) seam allowance all around the bag.
Strap
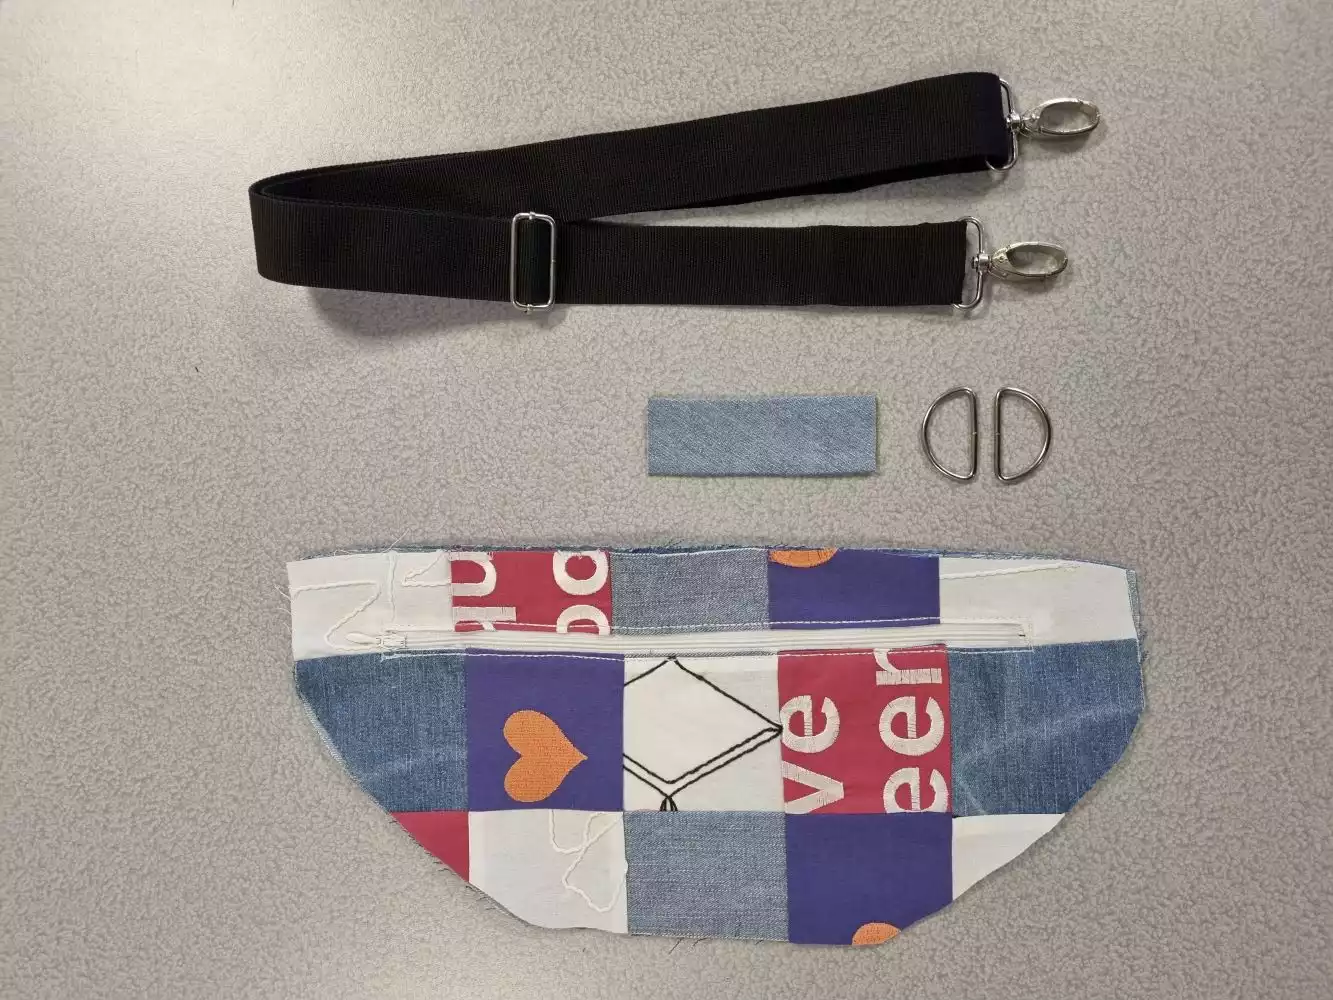
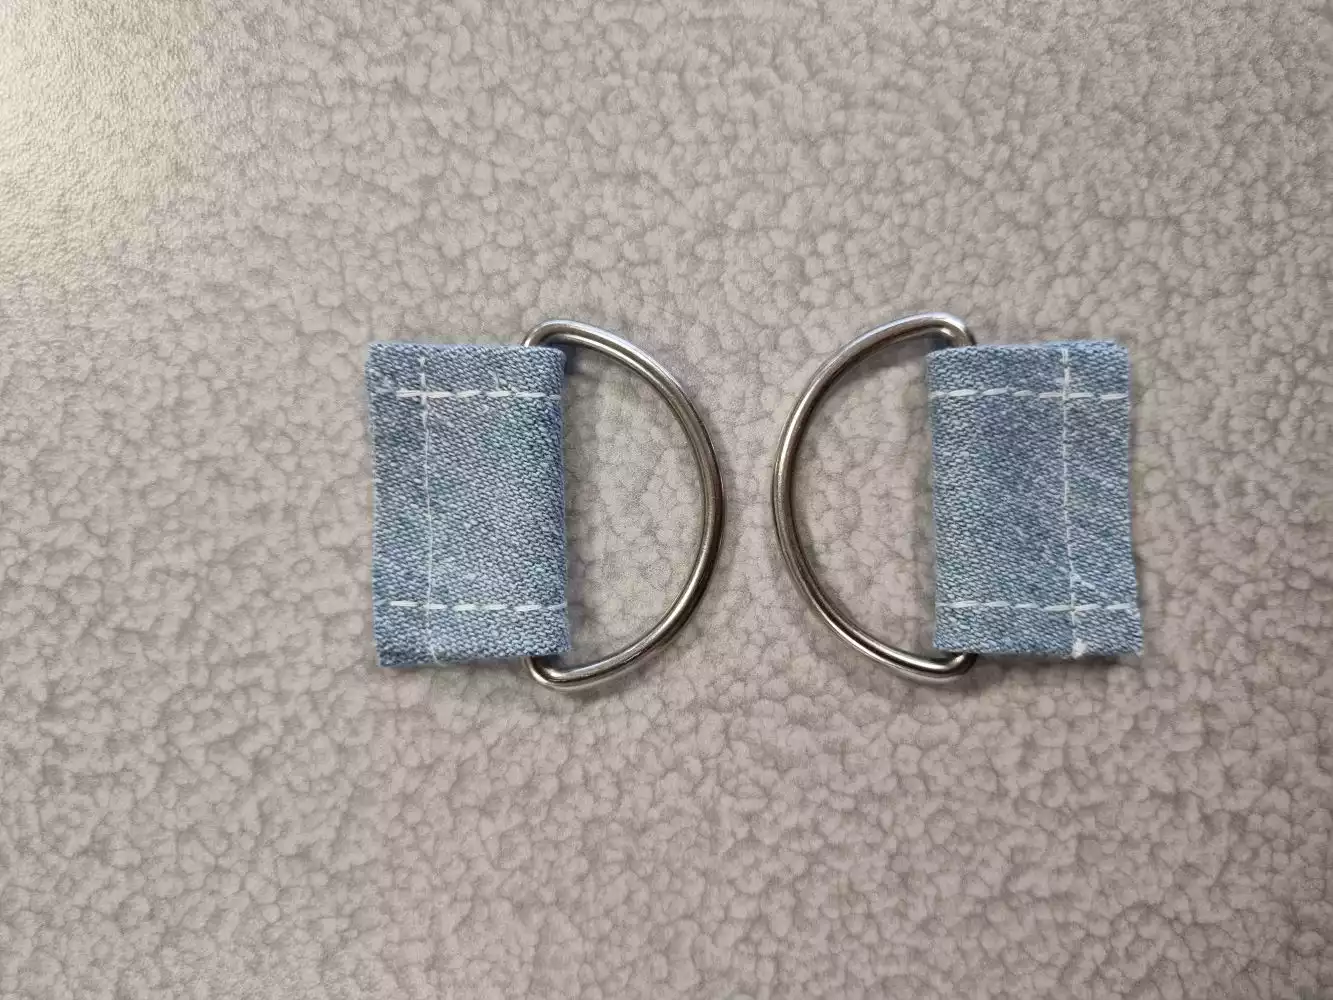
31. Let’s create 2 fabric loops for attaching the D-rings to the bag. Take your already cut out pieces.
Use your iron and press 2/4 “ (1 cm) on each side to the reverse side, making the loop into the size of your D-ring. My D-ring size is about 1.4” (3,5 cm).
32. Go to the sewing machine and do top stitching to fix the sides. I used a triple straight stitch stitch length 3.5 to mimic a visible jeans topstitching. Now place the D ring inside the loop and stitch it close using regular straight stitch.
33. Place your loops in their correct positions on the sides of the bag, as markings on your pattern suggests. Hold in place using a needle. Baste them into position with your machine.
Final steps
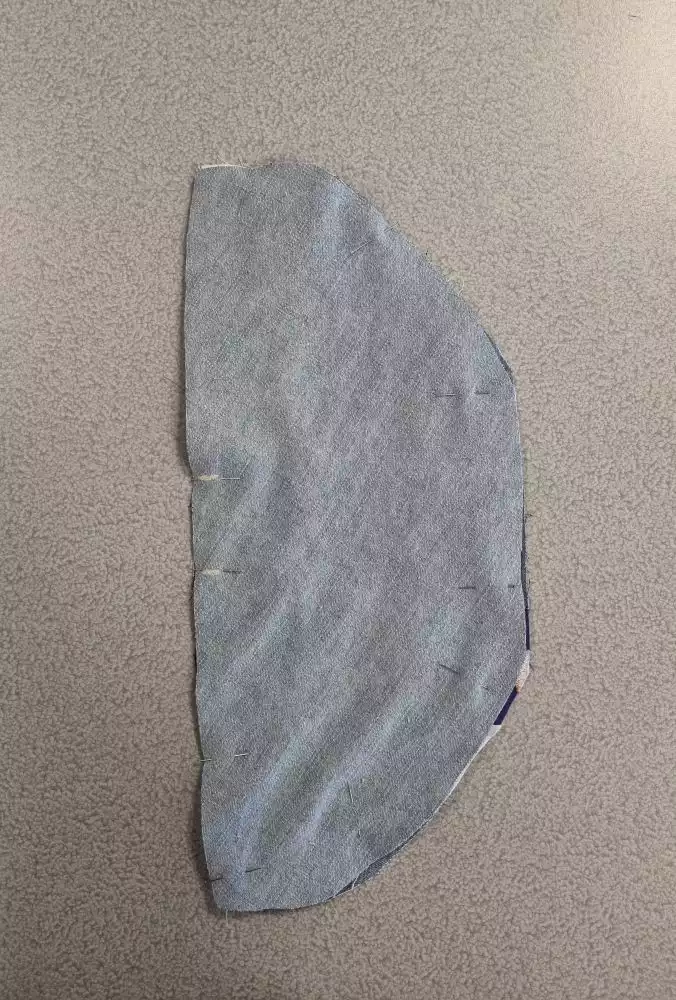
34. Place the 2 quilted fabric pieces face side together and add a few needles to hold them in place.Now sew around the quilted fabric, ¼ “ (6mm) seam allowance, all the way around.
35. Sew back and forth a few times on the D-ring loops to really make sure they are secure.Turn the bag right side out through the opening in the lining. Keep in mind to open the zipper before you start. Find the opening in the lining and sew it close using straight stitch.
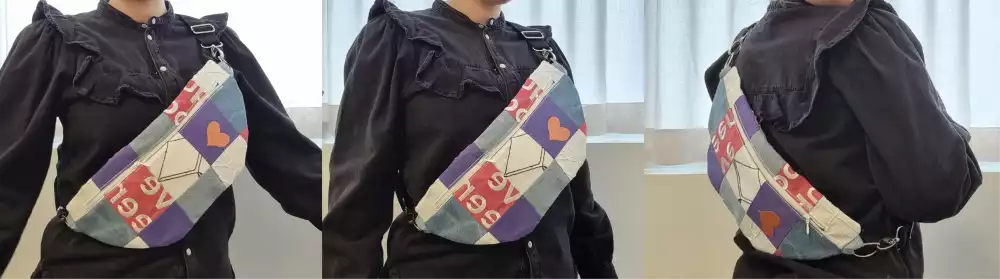
36. Give it a final press, attach the strap to the D-rings and it is finished!