United States
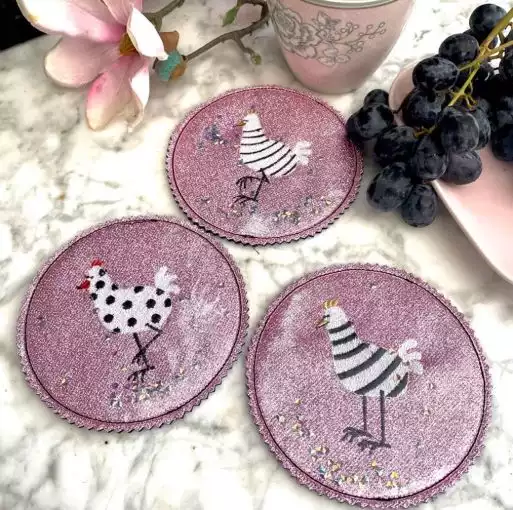
Create Coasters for Easter with this Freebie Embroidery Design

Do you have a mySewnet™ embroidery software subscription? Then send one of the chickens from the mySewnet™ Library directly to your mySewnet™-enabled machine, or download them in the embroidery design format you want for free and keep!
The funny chickens can be used for many Easter projects. You get glass coasters with our three ready-made chicken designs.
The chicken design numbers in the mySewnet™ library are:
In the mySewnet Platinum Embroidery Software, we created a running stitch ring for positioning the base fabric and added a stop command. The second running stitch ring fixes the placed fabric. Once the chicken is stitched, the finishing loop of running stitch comes out of a double running stitch.
With 30-day Free Trial of mySewnet Embroidery Software you will get to try out the most user-friendly and feature rich digitizing software on the market. It works with all embroidery machine brands and is available for both Windows and Mac.
What do you need for the glass coasters?
- Fabric scraps approx. 5"x 5" (12 cm x 12 cm) per chicken
- Wool felt 2 mm thick, approx. 5"x 5" (12 cm x 12 cm) for each chicken
- Removable embroidery stabilizer approx. 6" x6" (15 cm x 15 cm) per chicken
- Embroidery threads of your choice
- Masking tape
- Pinking shears
Optional:
- Glitter powder (craft supplies)
- Table cloth Foil
How is it embroidered?
1. Hoop the tear-away stabilizer into your 120mm x 120mm embroidery frame. Embroider the first placement line. The stop command stops your machine automatically.
2. Place your backing material on the stabilizer and fix it with the second running stitch line. Now it's time for the chicken, embroider the design. Take your embroidery hoop out of the embroidery unit.
3. Attach a piece of wool felt to the back of your embroidery frame with masking tape. The right side is visible on the underside of the hoop. If you put foil on top of your chicken design and sprinkle glitter powder underneath, you will get magical bling-bling chickens for your Easter table.
4. Fix the tablecloth foil with masking tape on the embroidery stabilizer area. This way you ensure a clean embroidery process. Put the hoop back on the embroidery arm and embroider the third running stitch circle. It connects all layers together.
5. Now cut nicely around the circle line with the pinking shears and voila, you're done!
We wish you a lot of fun!
The chickens with finished appliqué border:
Try our embroidery digitizing software free for 30 days!