 United States
From Computer to Embroidery Machine
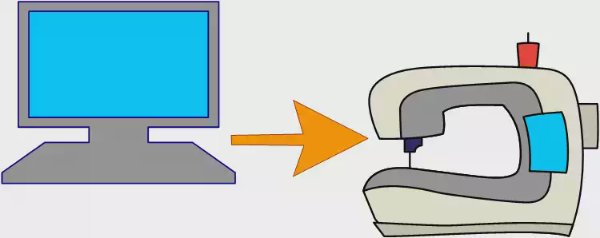
From Computer to Embroidery Machine with mySewnet™ - Communication is Key!
Computer and machine artwork from mySewnet Draw & Paint.
How many times have you fashioned a perfect embroidery in your mySewnet embroidery software, and then weren’t sure how to preserve your new design, or get it successfully onto your embroidery machine?
With 30-day Free Trial of mySewnet Embroidery Software you will get to try out the most user-friendly and feature rich digitizing software on the market. It works with all embroidery machine brands and is available for both Windows and Mac.

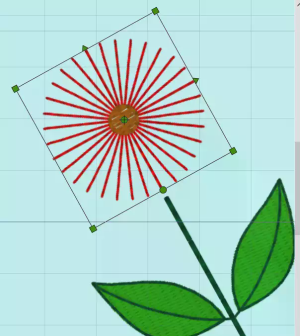
Illustrated above, flowers from SuperDesigns, Menu Floral 1 (Encore), elements 6 – Flower 2 and 7 – Leaves 1, default Size. Encore to Line, Line Option 3, 7 Repeats.
Lettering from Script Category, Valentina 12-40mm, Size 40mm, line Shape: Fit to Wavy Line.
Let’s take a look at some useful tools, designed just for you, for getting those embroidery files ready to stitch and onto your embroidery machine!
Working Files
When you design your own embroidery in mySewnet , subdesign elements such as Lettering, SuperDesigns, Frames, and Embellishments like Ribbon, Yarn and String of Beads are initially open, or changeable, design elements.
In the Embroidery module/app, open elements have green corner handles on their select box to indicate properties can be adjusted while retaining their quality.
- If you design your own Cross Stitcher embroideries, the .krz file types are also fully editable.
- And in mySewnet Digitizing .edo files (plus the .edo files from ExpressDesign in mySewnet Embroidery module), also retain flexibility for editing.
To save a ‘working file’ for your original creations with open objects, just Save or Save As from the File tab or Quick Access toolbar in Windows™, or from the Actions menu or File menu in Mac™.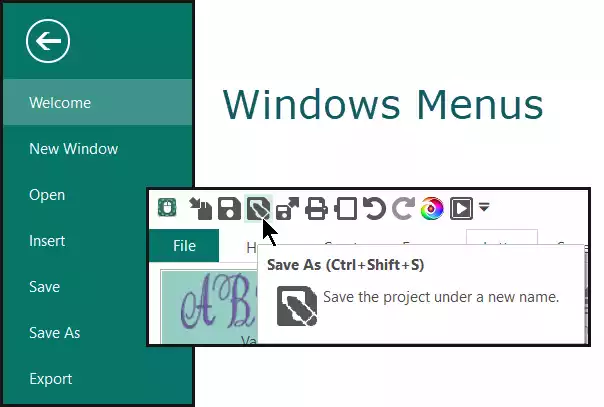
- When working in the Embroidery module, the Save (Save As) file type is .vp4, a special file that retains the ability to adjust any design or subdesign with green corner handles on its select box.
- In Digitizing / Create, the working file type is an .edo file.
- In Cross Stitcher, it’s a .krz file.
TIP: Whenever you design something unique, it’s wise to back up a ‘work in progress’ with Save or Save As, in case you later want to change it up!

One of the fabulous benefits of designing yourself is being able to reopen and remake something as many times as your heart desires without losing any quality in your final result!
Once you reopen saved working files, it’s a breeze to change up open elements like names or other words, Ribbon, Bead or Yarn Embellish designs you’ve created yourself in the Embellish tab, and of course, Cross Stitcher designs saved as krz files, or Digitizing / Create .edo files you designed yourself.
Finalizing for Embroidery Machines
You’ve finished your new creation, and saved a working file type. The next question is, how do you get it to your own personal embroidery machine?
Here are some popular options for finalizing and transferring design files!
Export
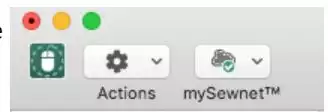
Export is in the Quick Access menu or File tab in Windows, and in the Actions button in the main toolbar or the File menu in Mac, for mySewnet Embroidery software.
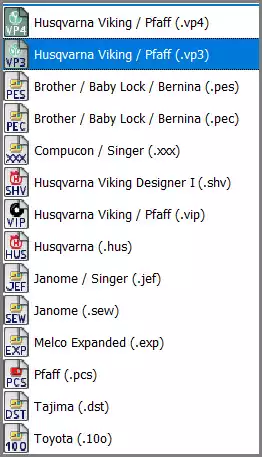
Export closes and finalizes the open embroidery elements in your working design so it’s ready to use on any embroidery machine. If you don’t have a mySewnet wi-fi connectibile embroidery machine, Export and save or copy to a USB stick to transfer the finished design to your machine.
Export offers multiple file types for most embroidery machines.
For detailed steps and explanation of how to Export, open the Help system and search for Export!
Send to mySewnet 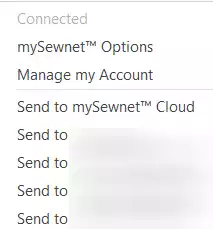
Send to mySewnet contains setup Options, a link to your Account, and multiple methods for transferring embroidery designs so you can stitch them on your mySewnet wi-fi compatible machine.
Shown in illustration, with owner’s specific info hidden.
Send to mySewnet is found in the upper right corner of the Menu Bar in Windows mySewnet,
![]()
In Mac, the mySewnet drop down menu is at the left side of the main toolbar.
TIP: Make sure your mySewnet wi-fi enabled embroidery machine is connected to the internet, and is logged into your registered mySewnet account.
Your computer must also connected to the internet, and logged into your mySewnet Account from Configure .
The mySewnet Connect function, found in the Windows taskbar or Mac title bar, will be active. If you aren’t connected or logged in, the Send to mySewnet menu will be inactive.
And the mySewnet Cloud Sync function must be active, as well, to be able to communicate with the Cloud. If you don’t have a mySewnet account, visit mysewnet.com to create one.
If you don’t have access to internet at times, you can always use Export and transfer with a USB stick.
For more information on how to download and set up a account, visit mysewnet.com
Send to mySewnet Cloud
If you own an embroidery machine with mySewnet wi-fi connectibility, when you aren’t ready to stitch immediately, simply send your embroidery design into the Cloud, and then select it later from your mySewnet wi-fi embroidery machine’s file menu.
Send to mySewnet connected Machine
Once your mySewnet wi-fi enabled machine is powered on, connected to internet, and logged into your personal mySewnet account, you can send a design directly to the screen of any embroidery machine listed in the Send to mySewnet menu. Sending directly to a machine is great when you want to stitch it now, but not add it to the Cloud or the machine’s files.
TIP: You can also send to other computers logged into your account! Great if you design on both Mac™ and Windows™ PCs.
No Software? No Problem!
Download and use mySewnet Embroidery Free, so you can open and view embroideries, send to a mySewnet Cloud Account, Export for use with USB, or transfer directly to your mySewnet wi-fi enabled sewing and embroidery machine.
Or, would you like to try it out to see how it all works? Sign up for a free, 30 day trial to test drive the whole Platinum package at mysewnet.com!
Hint of the Day:
Did you know that open Letter blocks have a Handles Menu with multiple options to change up your Letter styles?
Have a fabulous day from the software team at mySewnet™ Embroidery Software!