 United States
Tips & Hints for Creating a Lidded Fabric Pumpkin Bowl
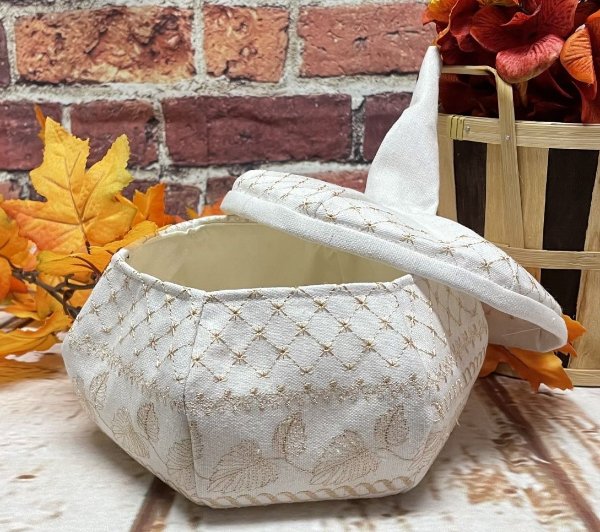
Use your machine’s decorative stitches to create a sophisticated pumpkin bowl to add to your holiday decor
What you need:
- Sewing machine with decorative stitches
- Fat Quarter of mid-weight linen fabric (for exterior) plus a scrap for the stem
- Fat quarter of cotton fabric (for lining)
- Approximately 24” of bias tape for the lid
- Approximately 1 yard of woven fusible interfacing
- Cut-Away Stabilizer
- Embroidery thread and bobbin
- All-purpose sewing thread
- Included PDF pattern pieces
Preparation:
1. Save time by interfacing the entire piece of exterior fabric before adding decorative stitches and cutting out your pattern pieces. I also interfaced the lining fabric before cutting.
2. Fill the entire piece of fabric with a variety of decorative stitches. I chose to do my stitching in all one color to give my pumpkin a sophisticated look, but feel free to make yours colorful or to match your holiday decor.
3. Use the cutaway stabilizer to support your fabric while stitching. No need to cut anything away when finished stitching as the stabilizer will help give your bowl shape without the need for batting or additional interfacing.
4. You may find it easier to make multiple copies of the pattern pieces to help you decide on exact placement of your decorative stitching. If you prefer to “fussy cut”, you may need to decorate more than one fat quarter of fabric.
Putting it together:
5. After cutting out all of your exterior and lining pieces, stitch together the 6 exterior pieces and all 6 lining pieces on each long side, adding one at a time until you have 2 enclosed shapes. Use a ¼” seam allowance.
6. Place the lining into the exterior wrong sides together.
7. I turned in both the exterior and the lining seam allowances at the top of the bowl and topstitched to finish.
8. Stitch the lid pieces together in the same manner as the bowl using a ¼” seam allowance.
9. Insert the lid lining into the lid exterior wrong sides together and baste together around the bottom.
10. For the stem, I just created a wonky tube and used a satin stitch to attach it to the top of the lid. You could also hot glue a twig to the top for a more rustic appearance.
11. Attach the bias binding to the bottom of the lid using your preferred method. My binding strip was 2” wide and allowed the lid to sit nicely on the top of the bowl.
Press nicely and enjoy!