 United States
Join and Fold a Key Fob
What you need:
- Join and Fold Edging Foot
- Clear 1⁄4” Piecing Foot
- Narrow Zipper Foot
- INSPIRA® Tear Away Stabilizer
- INSPIRA® Cut-A-Way Stabilizer
.jpg?language_id=1)
Fabric A to the left | Fabric B to the right
- Fabric A strip 2” x 14”
- Fabric B strip 2” x 14”
- Robison-Anton cotton or rayon thread
- Fasturn Tube Turner
- Safety pin
- Black Swivel Clasp
.jpg?language_id=1)
Sew
1. Thread with regular sewing or decorative thread on top and in the bobbin.
2. Select the stitch you would like to use. Your machine may have stitches built in for the Join and Fold Edging Foot. It’s easy to see what a stitch is for, by touching Quick Info , then the stitch. It will tell you what the stitch is used for. There are stitches available for download at ???
3. Fold a ¼” of the long side of fabric A to the wrong side, then finger press or iron the first few inches.
.jpg?language_id=1)
4. Insert the folded edge of fabric A with the right side up into the left fabric guide, and fabric B (right side up) into the right guide.
.jpg?language_id=1)
5. Slide the folded fabric A and fabric B into the foot, prior to attaching the foot onto the sewing machine. Make sure fabric A and the fabric B slide easily through the openings.
6. Snap on your Join and Fold Edging Foot.
7. Place INSPIRA® Tear Away Stabilizer under the fabric.
8. Sew carefully, not too fast. If your machine has a speed control, reduce the sewing speed to easily guide the fabric and edging as you sew. Hold the left-hand fabric in your left hand and the right-hand fabric in your right hand and sew.

9. Stitch the length of the strips.
10. Tear off the stabilizer and press.
11. Trim the stitched strip to 12½” long and 2¼” wide with the stitching centered.
12. Snap on your Clear ¼” Piecing Foot.
13. Thread with Robison-Anton sewing thread on top and in the bobbin.
14. Fold the stitched strip in half, right sides together, lengthwise and stitch, back tacking at each end.
15. Turn right side out using your Fasturn Tube Turner.
16. Press with the stitching centered.
17. Cut a strip of INSPIRA® Cut-A-Way Stabilizer ¾” wide and 12” long
18. Using a safety pin, thread it through the stitched strip.
19. Slide on your swivel clasp. “Turn inside out” and bring the ends together, right sides together as shown. Pin the end.
20. We need to stitch across the end. In this case, we have a seam to match in the center. If you start stitching on the end, no matter how well you pin it, it tends to slip, making your seams a bit off. So, instead of starting on the end, lower your needle into the seam, with the seams perfectly matched as shown.
.jpg?language_id=1)
.jpg?language_id=1)
21. Stitch a few stitches forward, then turn your key fob around so that the bulk of the fabric is to the right. Then stitch to the end.
22. Turn the key fob back around, and finish the stitching, back tacking securely.
.jpg?language_id=1)
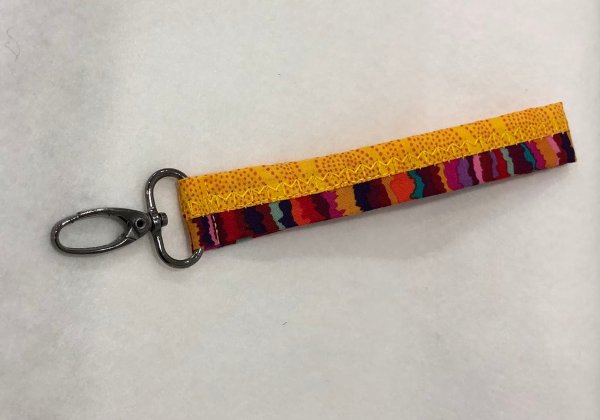
23. Turn the fob right side out and slide the swivel clasp into position.
24. Snap on your Narrow Zipper Foot.
25. Stitch across the end, as shown.
26. Snap on that key, and off you go!