 United States
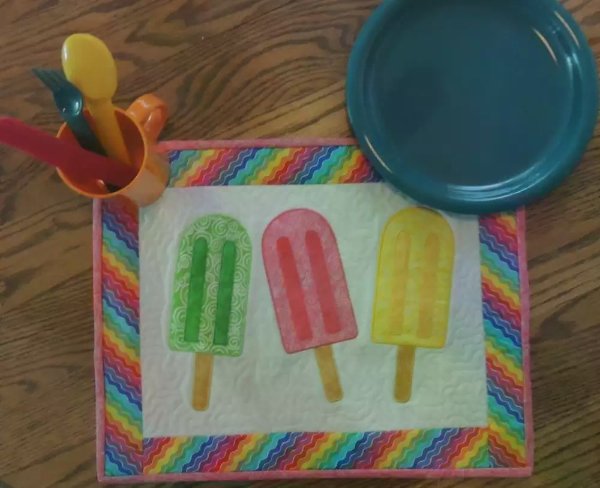
How To Digitize Summer Placemats, Part 1 - Applique
Applique is one of the easiest forms of digitizing one can create. With the Quick Create and Applique functions in the mySewnet ™ software digitizing applique becomes even faster and creates precut fabric files for the electric cutting machines or for precutting fabric pieces with Cutwork Needles.
With 30-day Free Trial of mySewnet Embroidery Software you will get to try out the most user-friendly and feature rich digitizing software on the market. It works with all embroidery machine brands and is available for both Windows and Mac.
What you learn:
Before you begin, create a new folder titled “Popsicle” on the computer desktop. This will help keep the files saved for this lesson organized. Be sure to download the popsicle image and save it to the popsicle folder you created.
Applique Digitizing:
1. Open mySewnet software, select Digitizing and select Load or Create a Background Picture. Click Next
2. Select Load a Picture, when the Picture Viewer window opens, navigate to where the Popsicle image is saved. Select it and click OK. Once the popsicle is in the Choose Picture window, click Next.
3. No need to Rotate or Crop Picture, Click Next.
4. Change hoop to: Hoop Group: Universal, Hoop Size: 120mm x 120mm. Click OK. Click Finish
5. Right click on the blue color in the Film Strip, and select Insert Color Change. When the Color Select window opens, Select Standard from the drop down under Quick Colors, and select the tan color. Click OK
6. Click on the Quick Create Tab. Click on Pattern Fill to deselect the option. Leave Satin Line selected. Select Applique. Select Quick Stitch.
7. Click on the popsicle handle. When the Color Tolerance window opens, leave the Number of Points on Low and click OK. Right click to deselect the Quick Stitch tool.
8. Right click on the Satin Line Applique in the Film Strip and select Properties. On the Line tab, change the Width to 2.5mm and Density to 3. Uncheck Closed Border Line.
9. Click the Applique tab and select Pre-cut Piece. Click on Select Fabric and a new window will open, under Applique Type, select Quick, and select the tan color from the Quick Applique Options and click OK to close the window. Change the Applique Piece Margin to 1.2mm and click on Match Placement Line. Click OK.
(The Pre-Cut Piece and Applique Piece Margin options are for those who prefer to precut the applique fabric pieces using an electric cutting machine or with Cutwork Needles. I have found using precut fabric pieces in applique to be very beneficial when stitching applique in the hoop. The differences and benefits of precut fabrics with electric cutter or cutwork needles will be explored further in part two of the Summer Placemat.)
10. Zoom in on the top portion of the popsicle stick and move the start/end point to the right (this will leave the top portion of the Popsicle stick unstitched allowing for a smooth overlap of the popsicle itself). Pull the stitch point up into the Popsicle as to create and overlap between the stick and the popsicle. Adjust any other stitch points if necessary.
11. Right click in the Film Strip, and select Insert Color Change and select the light green. Click OK.
12. Be sure that you are still on the Quick Create tab and both Satin Line and Applique are still selected. Click on Quick Stitch and click with in the popsicle area. When the Color Tolerance window opens, keep the Number of Points on Low and click OK.
13. Click on the View tab and select Object View (this will show the “stitches” as a single line and can make adjusting stitch point easier).
14. Zoom in on the top portion of the popsicle, and adjust the stitch points so that they are smooth and follow the contour of the popsicle. Adjust additional stitch points as needed. Click Zoom to Fit.
15. Right click in the Film Strip, and select Insert Color Change and select the dark green. Click OK.
16. Click on the Quick Create tab. Satin Line and Applique should still be selected, it they are not, select both options. Click on Quick Stitch and click inside one of the popsicle shapes. When the Color Tolerance window opens, keep the Number of Points on Low and click OK. Repeat for the second inside popsicle shape.
17. Zoom in on the top portions of the popsicle inner shapes and adjust the stitch points so they are following the contour of the shape. Adjust additional stitch points as needed. Click Zoom to Fit.
18. In the Film Strip, click on the dark green color, hold down the Shift key on the keyboard and click on the color 7. (This will select only the inner Popsicle shapes)
19. Right Click on the select shape and select Properties and the Fill Area Line window will open. Click on the Drop-down arrow next to Satin line and Triple Stitch. Click on the Applique tab and select Pre-cut Pieces. Click on Select Fabric, the Applique Selection window will open, select a dark green and click OK. Change the Applique Piece Margin to 1.2mm and click on Match Placement Line. Click OK. (Since both inner popsicle shapes are selected, they can to be change together, which is a great time saver)
20. Click on the Home tab and click on Change Hoop. When the Hoop Selection window opens, Select Universal for the Hoop Group and 200mm x 200mm for the Hoop Size and Natural Orientation.
21. Click on Modify Block, a drop down menu will open, and select Scale to Hoop.
22. Click on File, and select Save As and save as “popsicle applique” to your computer.
(This will save an .edo file, which is a working file. It is a good idea to save the .edo file to allow for adjustments that may be needed after the initial stich out. It is highly suggested to stitch out the design and check for possible adjustments before stitching the design out on the final project).
23. Click on File, and select Export Applique Pieces and click on the icon under Export for Cutter if it is not already active. (If all the options under a particular section are “grayed out”, this is an indication that the option has not been selected.) Select SVG, and click Export. Name the “applique cutwork precuts” and save to your computer. (This Export for use with electric cutters)
24. Click on File, and select Export Applique Pieces and the Export Applique Pieces window will open. Click on the icon under Export for Cutwork Needles and select 2 Cutwork Needles next to Method. Cutwork Line, be sure there is a check mark in the box next to Include Secure Points and leave Distance Between Secure Points at 30mm. Select your chosen file type VP3 or VP4 and click Export. Name the “applique cutwork precuts” and save to your computer. (This Export is for precutting fabric with the Cutwork Needles.)
25. Click on the X in the upper right hand corner to close the digitizing window. (Notice that the popsicle you digitized is now in the base of the software. Having the windows integrated is a wonderful addition to the software and allows addition adjustments to be made. The handles around the design are green, indicating that the design is not “Fixed as Stitches” and the design can be edited).
26. Click on File, Export and save as “Popsicle Applique” in VP3 file format or the file format for your machine.
27. Stitch a sample before stitching on final project. Since the .edo file was save, you can open the file and make any necessary changes.