 United States
Eyeglasses Case
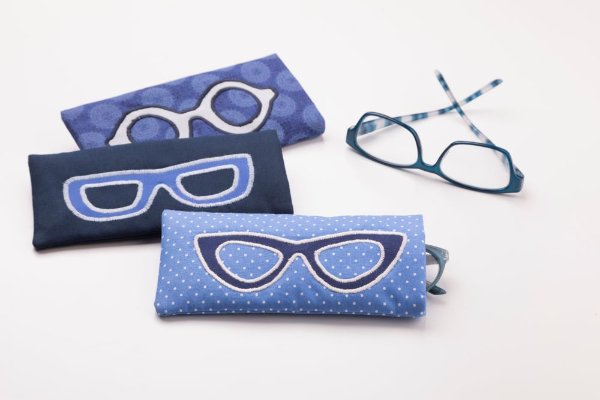
Protect your glasses with this easy-to-make eyeglasses case. The case has a layer of quilt batting, offering that extra layer to help keep your glasses protected. Three different applique templates are provided, so choose the one you want for expressing your personal style. The supplies listed are for making one eyeglasses case, so if you’re making more, adjust as needed.
What you need:
- One 8” x 8” (20.3cm x 20.3cm) square of outer fabric
- One 8” x 8” (20.3cm x 20.3cm) square of lining fabric
- One 3” x 6” (7.6cm x 15.2cm) rectangle of contrasting fabric (for glasses applique)
- One 8” x 8” (20.3cm x 20.3cm) square of low-loft quilt batting
- One 3” x 6” (7.6cm x 15.2cm) rectangle of double-sided fusible web (for the applique)
- One 5” x 8” (12.7cm x 20.3cm) piece of tear-away stabilizer
- Temporary fabric spray adhesive
- Satin Stitch (decorative stitch) presser foot
- Pencil
- All-purpose thread for construction
- Threads for decorative stitching
- Small scissors
- Glasses templates eyeglasses template.pdf
- 3” (7.6cm) of ¼” (7mm) wide elastic
Sewing Directions
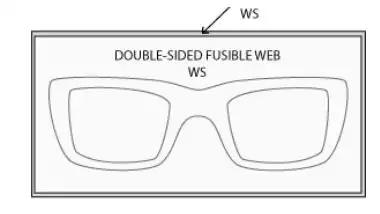
1. Trace your favorite “glasses” template onto the paper side of the double-sided fusible web using a pencil and the provided templates.
2. Following the manufacturer’s instructions, apply the double=sided fusible web onto the wrong side of the fabric to be used for the glasses applique. Don’t peel off the paper from the fusible web just yet! (Note: For the diagrams to follow, WS = wrong side, or the back side, of the fabric; RS = right side, or the top side of the fabric)
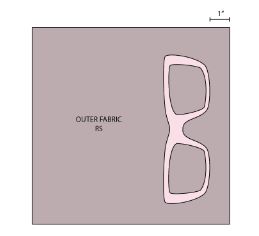
3. Cut out the glasses, using small scissors. Once all trimmed, peel off the paper from the fusible web.
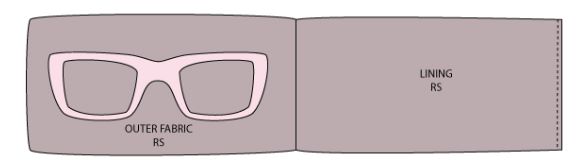
4. Position the glasses applique piece so it is centered face down about 1 inch (2.5cm) from the side edge of the outer fabric. Following the manufacturer’s instructions, fuse the glasses applique in place with an iron.
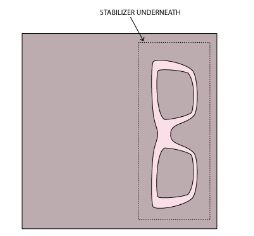
5. Following the manufacturer’s instructions, use temporary fabric spray adhesive to adhere the tear-away stabilizer to the fabric’s wrong side, centered behind the glasses.
6. Remove the all-purpose or regular presser foot, and attach the Satin Stitch (decorative stitch) foot. Set the machine for a zig-zag stitch 2mm wide, and adjust the stitch length so stitches are close enough together so that you don’t see fabric between the stitches. Zigzag around all of the edges of the glasses applique, securing them to the main fabric. When finished stitching, gently remove the tear-away stabilizer. Remove the Satin Stitch foot and place the all-purpose foot back on the machine.
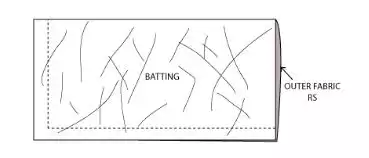
7. Fold the outer fabric in half with right sides together and side edges aligned. Sew along the side and bottom edges with a ¼” (7mm) seam allowance. Trim the seam allowance to about ⅛” (3.5mm) and then turn the case right side out. Press flat.
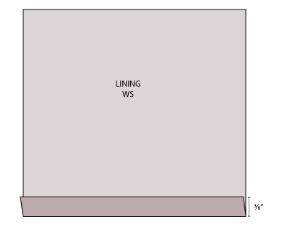
8. Turn under the lining’s bottom edge ⅜” (9mm) and press flat.
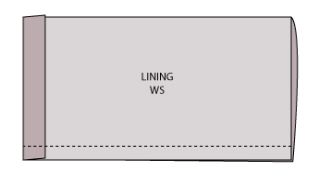
9. With right sides together and side edges aligned, fold the lining in half. Sew the side seam with a ¼” (7mm) seam allowance. Trim the seam allowance close to about ⅛” (3.5mm).
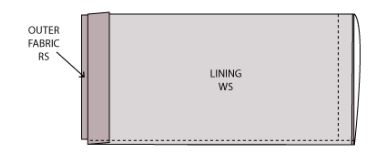
10. Slip the lining over the outer case with right sides together and top edges aligned. Sew the top edge with a ¼” (7mm) seam allowance and then trim it.
11. Pull the lining right side out over the outer fabric. Press the top edge’s seam allowance toward the lining. To close the bottom, topstitch it close to the folded edge of the lining.
12. To finish, tuck the lining into the eyeglasses case and lightly press flat.
