 United States
Dino Pillow Nuggets
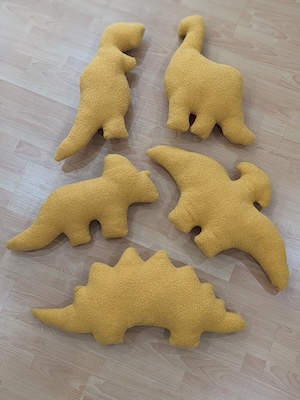
Sink your teeth into a sewing project that is adorable and fun with these Dino Nugget throw pillows! Made of faux sherpa fleece and stuffing, these pillows are made to look like a tasty delight in the shape of your favorite dinosaur and are incredibly soft and huggable. This simple sewing project can be made by sewists of all skill levels, and makes the perfect quirky decor for the young or the young at heart!
Machine:
Tools:
-
Water Soluble Fabric Marker
-
Pins or Fabric Clips
-
Fabric Scissors
-
Hand Sewing Needle
-
Walking Foot (Optional)
Materials:
-
1-3 yards Faux Sherpa Fleece in Yellow or Tan
-
Matching Thread
-
Poly-fil
Instructions:
-
Print and assemble the pattern pieces. Cut around the seam allowance (dashed line) of each piece you would like to make.
-
Lay out the sherpa fleece fabric on a flat surface in a single layer with the correct side down and smooth out any wrinkles.
-
Trace your desired piece, adhering to the noted grainline, on the wrong side of the fabric. Mirror the piece and trace a second time. Copy all notches.
-
Cut out the two pieces along the marked line. Tip: when working with a knit fabric, do not cut notches into the piece itself, as this may cause part of the knit to unravel. Instead, mark the notches with your fabric marker, or cut a triangle outside of the seam allowance to indicate a notch.
-
Place the cut out pieces with the right sides together. Match all major landmarks, such as the legs,head, tail, etc, as well as any notches. Use sharp sewing pins or fabric clips to secure in place. Tip: Ensure that your hand fits between the indicated notches for stuffing. If you need more space, move one of the notches out a little farther.
-
Set the machine to the zig zag or lightning stitch.
-
Optional: install the walking foot on your machine for easier sewing.
-
Begin your seam at one of the “leave open for stuffing” notches. Use a half inch seam allowance. Stop and lift the presser foot to rotate around curves and corners when needed. FInish your seam when you reach the second “leave open for stuffing” notch, leaving enough space for your hand to fit between the notches.
-
Turn the pillow right side out using the hole that you’ve left for stuffing. Gently push out any areas, such as the legs or tail, that may not be fully outturned.
-
Use Poly-fil to stuff the pillow to your desired fullness and huggability.
-
Double thread a hand sewing needle. Use a whip stitch to close up the remaining open area; secure with a knot.